Dracaena Root Rot. How To Identify It & How To Fix It
Dracaena is an easy-care plant, which means it needs much less care and attention than most other popular houseplants. However, being a succulent dracaena is very susceptible to developing problems when its care routine is incorrect. The most damaging problem this plant can face is root rot.
In this article I cover everything you need to know about the causes of root rot, its symptoms and what it looks like, and of course the steps you need to take to treat your plant.
Table of Contents
- Guide to identify and fixing dracaena root rot
- What to look for – dracaena root rot symptoms
- The 3 common causes of root rot in plants
- If caught early a plant can recover from root rot
- Dracaena can recover quickly from root rot if treated as soon as symptoms appear
- How to save an overwatered dracaena
- The 5 step strategy for treating dracaena root rot
Guide to identify and fixing dracaena root rot
Dracaena is a popular tropical succulent that is grown as a houseplant all across the country (though pet owners should know that it is poisonous to cats and dogs and so is the dragon tree).
Dracaena is a tropical succulent that, although an easy-care plant can suffer from a melody of problems.
Common problems range from a lack of growth to a drooping of the plant and even death, when its easy-care routine is not properly followed.
The biggest problem a dracaena can face is root rot.
Growing natively in Africa, Southern Asia and parts of Australia dracaena is a name given to a genus of about 120 tropical succulent shrubs and trees.
Dracaena plants grow well in the average home as normal home temperatures are perfect for the plant.
However, even though the plant grows well indoors and is easy-care, when you plant a dracaena in the wrong type of soil, overwater it or over-fertilizer it, the plant will likely develop root rot.
Unfortunately, because root rot is so serious, when a plant’s roots start to rot there is no guarantee that the plant can be saved.
Many plants will not survive root rot no matter what treatment they are given.
However, there is a chance that you can save your dracaena as many plants do recover from root rot but only when they get immediate, and correct, treatment.
So, it is worth the effort taking the simple steps needed to treat the plant.
Before I venture into the treatment for root rot you first need to be sure that your plant is suffering from this problem.
So, I will show you how to identify root rot in a dracaena and other plants.
What to look for – dracaena root rot symptoms
So what should you look for in a dracaena plant that you suspect has root rot?
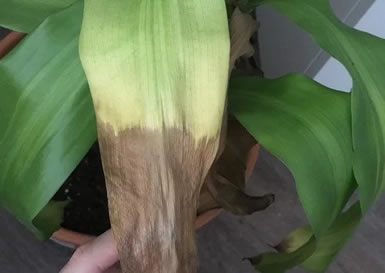
The first signs of root rot will be in the foliage.
Soft drooping leaves and soft stems are a clear sign of root rot (though there can be other causes for dracaena drooping).
If the base of the stem is mushy the plant definitely has root rot.
If left untreated the leaves of a dracaena with root rot will become yellow and will die.
Sometimes a dracaena, like aloe, can give off a bad smell when the roots are rotting.
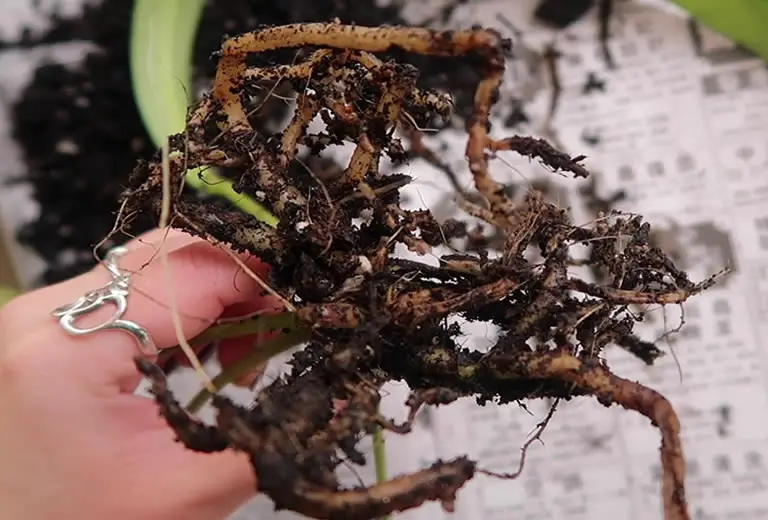
There will almost always be signs of root rot in the part of the plant above the soil. But, the only way to be certain if the roots are rotting is to remove the plant from its pot and visually examine the roots.
What dracaena root rot looks like
Below is a picture of healthily dracaena roots beside a picture of roots suffering from root rot.
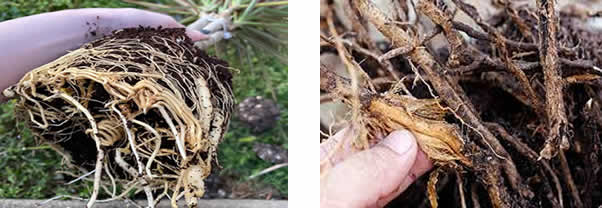
Note, that in the above image the roots on the right side of the image have been dead for some time.
They are brittle and dry.
However, it is possible to see roots that are completely blackened and mushy.
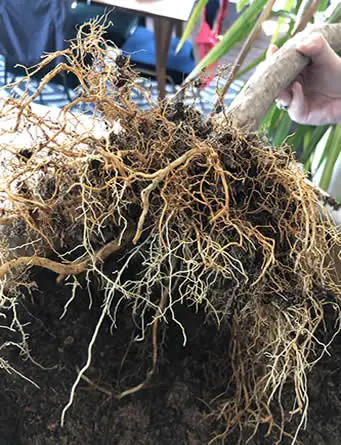
The healthy roots of a dracaena plant shown on the left of the image resemble noodles.
Healthy roots are springy and full.
If you catch root rot early enough you will see only some rotted roots that are beside healthy roots.
As you will learn later, these infected roots must be removed from the plant before they can spread the fungal infection to the healthy roots.
Before we look at ways to remove infected roots from a dracaena let’s quickly review how root rot is caused.
It is important to understand the causes of root rot as well as the symptoms because the cause is almost always due to an improper care routine – especially the dracaena’s watering routine.
The 3 common causes of root rot in plants
Now that you know what root rot looks like you will be able to effectively diagnose it in your dracaena (or any other plant).
Before I move on to show you how to treat this problem in your plant I will briefly explain what causes root rot.
Understanding all the causes of root rot will mean you can adapt your care routine to ensure you do not encounter this problem ever again.
Root rot in plants in caused by a fungal infection.
Fungus develops in the soil and attacks the roots of the plant.
This fungal infection is usually caused by an improper care routine and/or the use of an incorrect type of soil for the specific plant.
What improper care can lead to fugus attacking the roots of a plant?
Below are the 3 things that lead to root rot in plants:
- Overwatering.
- Soil water-retention & lack of oxygen in the soil.
- Over fertilization.
In rare occasions a plant can suffer from a fungal infection when its care routine is 100% correct.
This occurs when a healthy plant is potted beside an infected plant, or when it is potted in infected soil, or when it is potted in an infected pot.
This is why I always advise plant owners to thoroughly disinfect the pot of a plant that has any disease (to stop unintentional spreading) and then dispose of the pot.
Likewise, never reuse the same soil that a diseased plant was growing in!
Let’s briefly look at the above 3 causes for root rot as it relates to a dracaena plant.
I want to go into a little more detail about dracaena root rot causes so that you can avoid any future root rot problems.
Overwatering is the biggest cause of root rot in plants (especially succulents)
Overwatering is by far the biggest cause of the fungal infections that lead to root rot.
Why is this?
Well, root rot actually causes dehydration in the plant. The plant dies from a lack of water.

Although it seems counterintuitive to believe that a plant can die of dehydration due to getting too much water, this is actually the case.
You see when you overwater a plant, especially a succulent, the water gathers in the soil.
This causes the roots to sit in water and they rot.
A rotted root is unable to absorb moisture from the soil and thus is unable to distribute that water to the rest of the plant and so the plant becomes dehydrated.
Overwatering is one of the biggest causes for outdoor dracaena developing root rot.
Using an improper soil or pot can lead to dracaena root rot
Using an improper type of soil mix with dracaena will, most times, will lead to water retention in the soil and also lead to a lack of oxygen getting to the roots.
The same thing happens if you use a pot or container that has no drainage holes in its bottom.
This water retention in the soil then inevitably leads to the roots sitting in standing water and thus they rot, just as they would from overwatering.
Regular potting mix would have this effect.
As a succulent, regular potting mix can be lethal to a dracaena as it will hold onto too much moisture and force the plant to sit in standing water.
This will then lead to root rot.
*A word of caution: Although it is a succulent dracaena will not fair well if it is potted in a regular succulent soil either.
Most succulent soils contain sand and as you will see this is very bad for dracaena.
Obviously dracaena needs a fast-draining soil. This would make you think that a fast-draining succulent soil would be good for dracaena – after all it is a succulent … right?!
But, as strange as it may seem succulent soil is not good for dracaena any more than regular houseplant potting mix is.
A common mistake that many dracaena houseplant owners make is potting dracaena in succulent soil and then they wonder why their plant will not grow properly.
Dracaena requires a special type of soil.
Dracaena requires a fast-draining soil that is also airy i.e. a soil that not only drains well but that also promotes good airflow to the roots of the plant.
To sum up: when dracaena is planted in the wrong type of soil the roots can suffer and thus the entire plant will suffer.
The proper soil mixture for dracaena is:
- 1/2 compost or houseplant potting mix.
- 1/4 perlite or vermiculite.
- 1/4 pumice or potting bark.
The compost provides the dracaena will all the nutrients it needs while the perlite ensures the soil is fast-draining and will not retain a lot of water.
The pumice provides space in the soil for good airflow.
Giving dracaena the correct type of soil greatly reduces the chance of the plant developing root problems such as root rot.
If your dracaena is not potted in the correct soil the chances are high that the plant will develop problems.
If your dracaena is in the wrong soil you should repot it in the correct type of soil after treating the plant for root rot. Even if the plant is healthy you should still repot it using the correct soil type.
Over fertilization can also lead to root rot in a dracaena
Dracaena is a succulent and therefore does not require the same high volume nutritional support as many other houseplants.
Although you can use a regular houseplant feed on dracaena it must be made up to half strength only and it should be used sparingly.
Even when you are trying to make a dracaena bushier through systematic use of fertilizer and pruning, you should never use a full-strength feed.
Salts and other ingredients in regular fertilizer will attack the roots and cause them to rot.
Soluble salts restrict the water flow to the roots and leave them susceptible to developing root diseases that lead to root rot.
I advise you use a succulent feed only unless you can get your hands on a fertilizer specifically formulated for dracaena.
This way you are less likely to cause root damage from over-fertilization.
If caught early a plant can recover from root rot
Can a houseplant come back after its roots have been infected by a fugus?
There is no guarantee that a plant can recover from root rot.
Only plants that have received treatment before the entire rootball has been infected stand a chance of recovery.
It is worth treating an infected plant though as many do survive.
Before you treat a plant for root rot you should consider taking a few cuttings from the plant, somewhere where the stems are still healthy.
Then use those cuttings to propagate new plants.
Dracaena can recover quickly from root rot if treated as soon as symptoms appear
We have seen that a plant can survive root rot if the problem is identified and treated early enough but what about your dracaena, can it survive a fugal infection that attacks the roots?
A dracaena can recover from root rot if there are even a few roots left uninfected.
If the entire rootball has been infected and all roots are dead it is unlikely the plant will survive.
Although there is no guarantee that a dracaena will recover from root rot it is still worth treating the plant as many do survive.
I must admit that I have lost a few dracaena over the years that I have treated for root rot.
But the good news is that I have revived many more plants than I have lost.
The key is to administer effective treatment before the fungus has had time to completely lay waste to the entire root ball.
The plants that I lost to root rot where actually gone before I even had time to effectively treat them.
Prior to the days of the World Web Web it was much harder for plant owners to diagnose problems with their plants and many owners waited too long before seeking expert help.
It is my hope that you have identified root rot in your dracaena early enough to apply the following fix.
How to save an overwatered dracaena
Now that you understand how root rot occurs and have, hopefully, made plans to adjust your future care routine, it’s time to discuss the action steps you must take to treat your dracaena for root rot.
You can save an overwatered dracaena if you act quickly and if the plant has not suffered irreparable root damage.
There is no guarantee that a plant with root rot will survive.
However, by acting quickly and giving the dracaena the correct treatment there is a very high chance you can save your plant.
I will now outline the exact strategy you must follow if you want to save your dracaena from root rot.
The 5 step strategy for treating dracaena root rot
Below are the things you will need to source before you begin the process of treating for dracaena for root rot.
To treat a dracaena for root rot you will need:
- Sharp scissors or pruning shears.
- Alcohol wipes.
- Kitchen towels or old newspaper.
- A good organic fungicide.
- Hormone powder and hormone gel (not completely necessary but helpful).
- A new pot.
- Fresh, light and airy, soil.
I covered the method for treating root in-depth in the article about aloe vera root.
That article has detailed instructions and images of each of the processes as you go through them.
Although the instructions in that article apply to treating dracaena root rot I will go through the steps again for convenience and in order to make this article a complete guide to the subject.
However, it isn’t a bad idea to review the aforementioned article after reading the remainder of this one as you may get further insight into the process.
Step 1. Remove the plant from its pot
You must remove your dracaena from its pot if you have not already done so.
Gently wipe away excess dirt from the roots.
It is best to do this over laid out kitchen towels or an old newspaper to avoid making a mess.
It also ensures you do not drop infected soil onto the ground where you can walk on it and then inadvertently spread the infection to garden plants.
Before you start cutting away the roots be sure you have clearly identified the areas of the rootball that are not infected.
These roots, no matter how small they are or how little an amount of them they are, must be left on the plant.
If there are no healthy roots left on the plant then you may want to take a cutting or two so you can try to propagate a new dracaena from them.
Step 2. Cut away all infected parts of the rootball
Once you have identified all areas of the rootball that are infected take your sharp pruning shears and cut away at the dead roots.
Don’t be afraid to hack away at the roots. It is better to take off too much, and get all the fungus, than it is to take too little, and run the risk of the fungus spreading to healthy roots and stems.
As long as there are some healthy roots left, no matter how small and trivial they seem and at least one stem, you will be able to successfully revive the pant.
However, even if there are no healthy roots left it is worth a shot at treating the plant as you may still be able to root what is left.
You must remove any foliage stems that are clearly infected.
They will be blacked and mushy at the bottom of the stem.
If all of the stems are infected then you will find that the entire rootball is also infected.
In such instances the plant is beyond saving and you must try to propagate a new plant from some cuttings (being sure you remove all lower parts of the cutting that are infected).
After every cut you make you must wipe the blades of your shears clean with a fresh alcohol wipe.
You do not want to take the chance of spreading the fungus to healthy parts of the root system. So, it is essential you do not skip this simple action step.
Step 3. Spray the rootball with fungicide
Once you have eliminated all the infected parts of the plant. Spray the entire rootball with fungicide.
Also spray at the very root of each stem to ensure no fungus is hiding there.
Be aware that merely using a fungicide on a dracaena (or any other plant) that has root rot is not enough.
You must remove the infected parts of the plant or the fungus will spread regardless of whether you use fungicide or not.
You use fungicide only as an aid for eliminating any remaining fungus that you may have missed.
Step 4. Repot the treated dracaena in new soil & a clean pot
Once the roots have been treated you must repot your dracaena in a different pot.
Fungi spores are undetectable to the human eye and you can be sure there are some that remain in the pot of an infected plant.
Do not be tempted to reuse the container after merely spraying it with a fungicide.
Don’t take the chance. Use a different container/pot.
Once you are ready to repot the dracaena fill the container with a third of soil (make sure to use the correct type of soil as outlined above).
You can, if you wish, add some hormone powder and gel to the rootball at the areas where you cut away the roots.
If you are also potting cuttings you should definitely dip the cut end into the powder first and then into the gel just before planting.
Don’t apply any hormone powder or gel to any of the healthy roots that remain. Simply spread it as best you can on or near the areas that you cut.
This is not an exact science, you are just giving the plant a little extra help to form new roots.
Place the dracaena on top of the soil and fill in the container and around the plant with soil until the container is filled.
Do not water the plant at this stage!
You are now going to create a humid environment, which contains more than enough moisture for your dracaena, without having to water the soil.
Step 5. Tent the treated dracaena
Tenting a plant involves creating a high humidity environment around the plant using either a specially designed tent or a simple clear plastic bag.
Obviously you will be unable to use a bag if you have a large plant but for smaller dracaena houseplants a clear bag will work just fine.
The bag must be clear to allow in light.
When using a plastic bag you can mist the inside of the bag, making sure to avoid misting the plant.
As the temperature inside this homemade plant tent increases the water will evaporate creating high humidity.
The dracaena can then get all the moisture it needs from the air without running the risk of further water-damaging the roots.
If you are using a larger store-bought plant tent then place a cheap humidifier in with the plant.
You can place the tented plant in an area that gets about 6 hours of good strong indirect light per day and wait for signs of recovery.
However when I treat dracaena root rot, in addition to placing the plant close to strong indirect light I also use a grow light – but only for 6 hours per day during daylight.
Do not keep the grow light on constantly. Dracaena also need darkness.
Using a grow light will give the plant the best chance of recovery.
Some plant tents come with built-in grow lights but they tend to be expensive costing several hundred dollars.
Whereas, you can get a separate tent and grow light for about 50 bucks combined.
Check on the dracaena every day and look for signs of new growth. When you see new stems or leaves appear you can remove the plant from its tent and place it at its permanent location.
I do strongly suggest you place a humidifier close to the dracaena though and make sure it gets at least 6 hours of strong indirect light per day or keep using the grow light.
If you get your dracaena watering routine correct from the outset you can avoid overwatering problems in the future.
Thanks for reading! I'm Michael — houseplant fanatic and your Pinterest plant guide.
Follow me on Pinterest for fresh updates 🌿


