How To Identify Aloe Vera Root Rot & Apply The 1 Simple Cure
Aloe vera, like most succulents, is especially susceptible to root rot and so it must be protected from it. If your aloe vera plant has root rot it is essential you take immediate steps to treat the plant or it will die. In this article I will cover everything you need to know about root rot in aloe vera from its causes to its cure.
I also show you how you can easily identify root rot and specifically, how to identify the exact cause of it in your plant so you can avoid future occurrences.
Video outlining steps to treat an aloe vera for root rot
Table of Contents
- What is root rot?
- The 2 main causes of root rot in aloe vera
- How to identify root rot in an aloe vera plant
- Root rot must be treated as soon as it is discovered
- How to give your aloe vera the best chance of surviving root rot
- The most effective aloe vera root rot treatment
- How to replant aloe vera after root rot treatment
- How to correctly water aloe to avoid root rot
What is root rot?
What exactly is root rot and why is it so dangerous to a plant?
Root rot is exactly what the name implies; the roots of the plant rot and die.
When roots begin to rot they are incapable of absorbing moisture and nutrients from the soil and are thus unable to distribute them to the rest of the plant. This leads to plant dehydration and starvation.
Root rot can spread if left untreated and if you do not take action to remedy the situation the plant will die.
Root rot is an extremely serious condition for any plant and must be treated as soon as it is discovered.
If root rot is identified at an early enough stage then the chances of your aloe vera plant surviving are very high. The longer the rot has been allowed to spread the lower are the chances of saving the plant.
Luckily, there are very clearly identifiable symptoms of root rot that you will see long before the plant has reached the point of no return.
I will show you later in this article how to identify root rot so that you are able to take action quickly to save your plant.
The 2 main causes of root rot in aloe vera
Now that we you know what root rot is you will probably be wondering what causes it and why your aloe vera is suffering from it.
There are 2 main causes of root rot in aloe vera: Overwatering and fungal infections. The roots of plants that are left in water-soaked soil will rot and die.
Fungal infections in the soil attack the roots and cause them to rot and die.
You should be aware that certain gnats can also cause damage to aloe vera that, although not caused by root rot, has very similar symptoms.
So, although overwatering and fungal infections are the two causes for root rot, an infestation of gnats can also damage your aloe vera plant’s root system in the same way.
For this reason I have included instructions for treating root rot symptoms caused by gnats, in conjunction with the treatment for actual root rot.
Aloe vera, being a succulent, is extremely susceptible to root rot from overwatering.
In my experience it is due to an incorrect watering routine that most aloe vera houseplants develop root rot.
Although fungal infections in the soil often cause root rot in plants, I have found that it is much more prevalent in outdoor aloe plants than in houseplants, simply because houseplants are not in open air environments where these infections can take hold and more easily spread.
This is also the case with gnats (though houseplants are at risk).
Although the root damage caused by gnats is not strictly-speaking considered to be root rot the effects and symptoms are the same.
With aloe vera houseplants, in my experience at least, the cause for root rot, in 90% of cases, is overwatering.
Succulents like all aloe plants must be watered sparingly and therefore it is essential you follow the correct watering routine for aloe plants if you want to avoid root rot.
How to identify root rot in an aloe vera plant
Root rot in aloe vera is easy to identify at the root level.
Examining the rootball of the plant will let you instantly know if there is a problem in that area.
Of course, before you dig up your plant you will need to have a reason for doing so. You will need to suspect the plant has root rot in the first place.
How will know?
The plant will give you clear signs that it is in distress when the roots are rotting.
Let’s take a look at how you can identify potential root rot in the foliage of the plant in order to give you enough reason to remove the plant from the soil to examine the roots.
Look for decay above and below the soil
Aloe vera root rot is easy to spot at the root level.
It is more difficult to spot in areas of the plant that are above soil level but the signs are still there.
Before I outline how you can tell if your aloe vera has root rot by examining the roots let’s first see how the plant let’s you know there is a root problem through its foliage.
Look for signs of rot in the plant stem and leaves
Before you remove an aloe vera from its pot to examine its roots be sure you have sufficient reason to do so.
Aloe vera, like all aloe plants, don’t like to be manhandled and their leaves should only be touched infrequently.
I’m sure, like me, you don’t want to be uprooting an aloe vera plant unless you absolutely need to.
This means, before you remove an aloe vera from its soil you will need likely cause to take such action. Obviously suspecting root rot is one such cause.
So, how do you tell if an aloe vera plant may be suffering from root rot through its foliage and that it needs removed from the soil so you can examine its roots?
Well, the first signs of root rot in an aloe vera can be seen in the leaves of an aloe plant.
Aloe vera plant leaves can turn yellow due to root rot
Dehydration in a plant that is watered often and that is sitting in moist soil is a clear sign that an aloe vera is suffering from root rot.
Now, I should note that a yellowing of the leaves, or a fading of leaf color, isn’t always due to root rot. You have just been underwatering the plant.
However, if your aloe vera has yellow leaves and is in moist soil, and gets watered at least once every 3 weeks, then dehydration from underwatering is not the problem.
But before you conclude that root rot is the cause consider how much sun the plant is getting.
A yellowing of aloe vera leaves can also be caused by too much strong sunlight.
But, because aloe are tropical desert plants they have evolved to thrive in direct sunlight and so a bleaching of the leaves via UV rays is a rare occurrence.
More times than not it is dehydration that leads to a yellowing of the leaves.
If your plant gets 8 – 10 hours of direct sunlight per day it is unlikely the yellowing of the leaves is due to a bleaching effect from the sun.
If your plant gets more sunlight than that then move it to an area with less hours of direct sunlight but also consider checking the roots for root rot.
If you are confident that neither underwatering nor too much strong direct sunlight are the cause for the yellowing of the leaves of an aloe vera plant then you should remove it from its pot and check the roots for root rot.
If the leaves are coming away from the plant then it is almost certainly a symptom of root rot.
An aloe vera plant can turn brown and soft when suffering from root rot
Brown mushy foliage are the most prominent signs of root rot.
When an aloe vera plant starts to turn brown and soft it is almost certainly suffering from root rot.
You must take immediate action.
More often than not, when the foliage on an aloe vera plant turns brown and soft the root damage is extensive. It may be difficult to save the plant, though it is worth a try.
When root rot first develops it will often be most apparent at the base of the leaf. It is this area that turns brown first and becomes mushy.
Most times this area becomes so weak that the leaf falls off the plant however it can spread causing the entire leaf to turn brown. Read more about this here.
If you spot a browning at the base of the leaves on our aloe vera plant, or a browning of the entire leaf, you should take immediate steps to examine the root ball for root rot.
An aloe vera plant that is suffering from root rot will also sometimes give off a bad smell.
Look for signs in the root ball
Once you remove an aloe vera plant from the soil to examine the roots it should become clear very quickly if root rot is the problem.
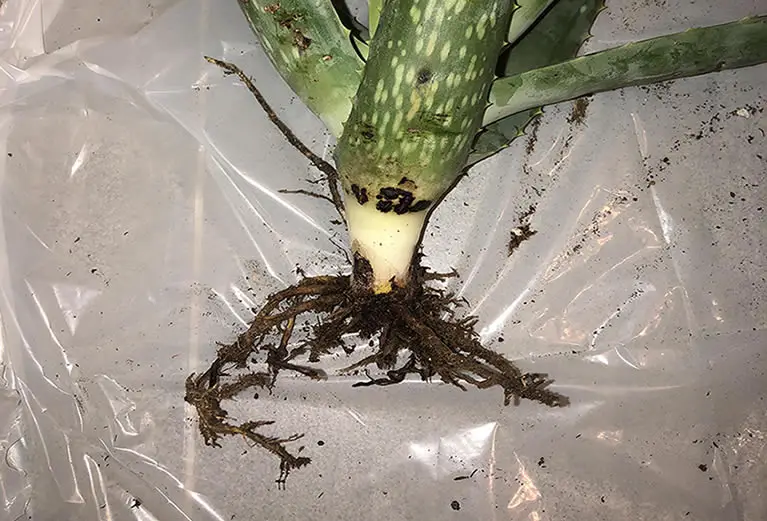
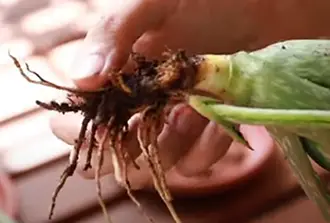
Aloe vera roots that are suffering from rot will have lost all their vitality and color.
Healthy aloe vera roots are a mixture of brown with a tinge of green. Unhealthy roots look dead and are black or dark brown.
Aloe vera roots suffering from root rot will also be shorter than healthy roots.
When you remove a healthy aloe vera from the soil it should have a large mass of roots.
However, as you can see in the image below, an aloe vera with root rot will have short roots with no signs of color.
The base of the plant where the roots form may also be blackened. This will often be the case if the entire root system has been compromised.
In the above image all soil and dirt have been removed from the roots to give you a clearer indication of what dead roots look like in an aloe vera.
However, when you remove your plant there will be soil around the roots giving them a darker, more black, appearance.
If there is no sign of green and the roots are completely dried up then the roots are likely dead.
If the roots are mushy then you may be able to save them by letting them dry out a little before repotting the plant but as long as there are other healthy roots I will usually just remove mushy ones.
The aloe vera plant shown in the image above was left untreated for too long after the initial signs of root rot and thus the rot spread throughout the entire rootball.
But, if you identify the symptoms of root rot in the foliage early then you will likely see a mix of strong vibrant roots along with dead ones when you remove the plant from the soil.
As I will cover later, only the dead roots need to be removed when the plant has root rot.
To see the difference between healthy roots on an aloe vera and unhealthy ones I have included the image below.
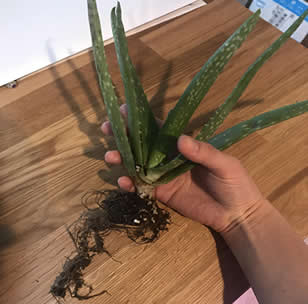
Images of aloe vera roots rotting vs healthy roots
Below is a picture of an aloe vera plant suffering from root rot compared to three aloe vera plants with healthy roots.
You can clearly see the difference between the root systems of the healthy plants and the sick plant.
You can also see the difference in the luster of the foliage.

The aloe vera with root rot has shorted roots. They are also blackened.
Roots with rot can be dry and will easily break away from the plant when touched. Sometimes the roots of an aloe vera affected with root rot can be very mushy if the plant soil is very wet.
Alternatively, healthy aloe vera roots have a vibrant look about them and will be a mixture of brown and green.
They will also be much longer and there will be more of them.
As I will cover later, in the section about treating root rot in aloe vera, you will often find both types of roots on a plant suffering from root rot if you catch the problem early enough.
Only the dead, infected roots will need to be removed.
The plant on the left of the image above has no healthy roots left at all.
Root rot must be treated as soon as it is discovered
Now that you know how to identify the symptoms of root rot what do you need to do about? Can you leave the plant alone and just hope that it will recover on its own?
Root rot will not go away on its own. You must take immediate action to treat root rot if you want to save your plant.
In the case of fungal infections root rot can spread from infected roots to healthy roots quickly.
If root rot has been caused by soaked soil, leaving the plant in the soil can damage the remaining roots.
So, as well as needing to fix the cause of the root rot in the soil you also need to protect the healthy roots from becoming infected by their close proximity to infected roots or by leaving them in water-logged soil.
You should never leave a plant suffering from root rot untreated.
Root rot is a plant killer. It is one of the most serious and damaging things a plant can suffer from. Without proper treatment a plant with root rot will die.
How to give your aloe vera the best chance of surviving root rot
Root rot is a very serious condition for any plant, and all plant types are susceptible to developing this problem if they are not cared for properly.
However, succulents (being mainly arid-land dwelling plants) are the most at risk from this hazardous condition. So, can aloe vera survive root rot?
Aloe vera can survive root rot as long as it is treated quickly and correctly. As long as the plant has not been left to completely die it should survive after treatment.
Aloe vera that have some healthy roots remaining have a very high survival rate after treatment.
If the the rot has affected all the roots the chances of survival are greatly diminished though there is still a good chance your plant will survive given the proper care.
As I already mentioned, root rot will not go away on its own.
In order for an aloe vera plant to survive root rot it must be treated and repotted in fresh soil. Failure to this will lead to the death of the plant.
The most effective aloe vera root rot treatment
Below are the steps you need to follow to treat an aloe vera plant that is suffering from root rot.
The first step is to identify the cause of the root rot, as outlined in this article, and then apply the appropriate treatment.
How to fix aloe vera root rot from overwatering
In my many years of experience it is overwatering that is the biggest cause of root rot in indoor potted aloe vera houseplants.
Therefore I have addressed this problem first.
Before I continue I would like to give you a quick word of warning: I have read on one fairly popular indoor gardening blog that you should allow the potting soil of an aloe vera with root rot to dry out before taking further action to treat root rot.
Do not do this!
Root rot must be treated immediately upon its discovery or it will spread to healthy roots and you could lose your plant.
If the soil in an aloe vera pot is water-soaked then the plant should be removed from it immediately! Don’t wait for the soil to dry.
Remove the plant from its pot and examine the roots. Hopefully there will still be healthy roots on the rootball though you will likely see many dead roots as well.
Your aim is to remove the dead roots and leave only the healthy roots on the plant.
Although it is possible to simply replant an aloe vera suffering from root rot due to overwatering I always urge plant owners to strip away the dead roots for two reasons.
Reasons to remove dead roots:
- It prevents infection of healthy roots just in case a fungus is present (fungi often accompany root rot because they thrive in moist environments).
- It encourages the plant to produce new roots.
To remove dead roots simply use a pair of sharp gardening scissors.
You may also need a sharp pointed knife to scrape away mushy parts of the root at the base of the plant to prevent spreading.
Below are 5 simple steps to treat root rot caused by overwatering.
Although these 5 steps are the same for treating root rot caused by fungal infections, there are a few initial things you need to do before following the 5 steps below when fungus is present (I cover these things a little later).
5 Steps to treat root rot in aloe vera
Step 1.
If there are parts of the root system that are still in good shape and display a green tinge then you can simply remove the dead roots.
Make sure once the roots are removed there is no black or mushy bits remaining on the root system.
All mushy parts of the roots should be removed. Sometimes this means removing entire sections of the rootball or even removing it entirely.
Step 2.
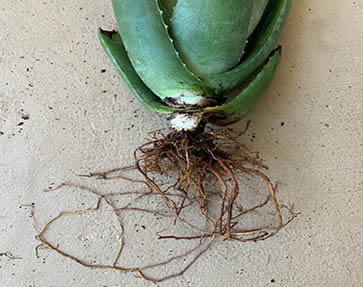
If the entire rootball has been affected remove it at its mushy part. See image below.
A badly damaged rootball will break away easily. You should remove the entire thing as any roots below the mushy part will be dead anyway.
Step 3.
Once you have removed the mushy part of the root you should take your scissors or knife and remove all infected parts of the plant.
If there are leaves that are mushy and brown at the base you should also strip these away from the plant.
Cut away all infected roots completely.
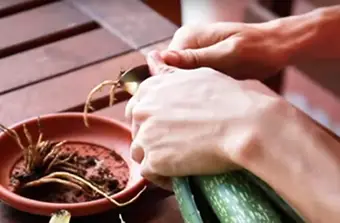
There should be no blackened parts of the plant left after you have removed the infected roots.
You can see in the image above that this particular aloe vera plant had a completely damaged root system and so the entire root system needed to be removed.
Step 4.
If the there are still healthy roots left on the plant then you can move on to the repotting stage after you have removed any mushy bits from the roots.
If, however, you had to remove the entire rootball then you will need to allow the area where you made the cut to harden over before repotting.
You do this by letting it dry.
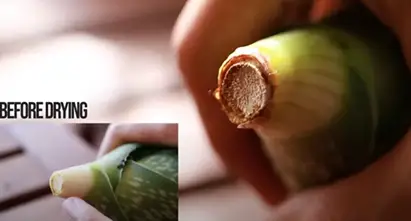
Leave the aloe vera plant sitting in a warm dry place for a few days until the area where the cut was made has hardened over and resembles the plant in the image above.
Step 5.
Repot the treated aloe vera plant in fresh aloe soil in a pot that has very good drainage.
If the root rot was caused by a fungal infection or gnats you should use a new pot.
If the problem was due to overwatering then the original pot, with fresh soil, can be reused.
Before actually repotting the aloe vera make sure the new soil is moist – not damp or soaked.
If you are unsure of how much water to use then simply place the pot and soil into a basin with an inch or two of water and allow the soil to soak up the water for about 15 minutes.
Then remove the pot and allow any access water to drain away for about 10 minutes before placing the plant in the pot.
For detailed repotting instructions see the section below.
How to fix aloe vera root rot from fungal infection
If the root rot in your aloe vera has been caused by a fungal infection then there are a few initial things you need to do before you follow the 5 steps outlined above.
You must first treat your aloe vera with a proven fungicide before you repot it. The aim is to eliminate the fungal threat completely.
Spray your aloe vera with a good organic fungicide.
Then remove it from its pot and wash the roots in a fungicide solution.
Doing this will not only treat the roots but will also wash away the soil and dirt from the rootball allowing you to better see how much damage has been done.
Once the roots have been washed and the plat has been sprayed with fungicide follow the steps above from step 1 through step 5 above ensuring you use only fresh soil and a new pot.
If you wish to use the original pot again for this plant or a different one then be sure to wash it thoroughly in a bleach solution.
I usually wash pots twice in bleach just to be sure I have totally eliminated all fungi spores.
Be sure to rinse the pot just as thoroughly in only water afterwards as bleach will kill a plant just as easily as fungi.
How to fix aloe vera root rot from a gnat infestation
Just as you need to treat the plant for fungal diseases you will need to treat it for gant infestations if bugs are the cause of your plant’s root rot.
The fungicide solution I advised you to use for fungal infections also works exceptionally well for fungus gnat infestations.
Although you do not need to remove dead roots from the plant (as the plant does not technically have root rot, just similar symptoms) I do advise you to repot your aloe vera in fresh soil after treating it.
The original soil may still contain gnat larvae and for that reason I think it is safer to simply repot the plant. Be sure to use a new pot and also use fresh soil.
When you remove the plant from its original pot spray the whole plant with the organic fungicide that I linked to above or a similar organic product.
This will do the plant no harm but will ensure all larvae are killed and also help prevent future infestations and/or fungal infections.
How to replant aloe vera after root rot treatment
Replanting aloe vera after root rot is simple. Follow the steps below.
9 steps for repotting aloe vera after root rot:
- Use a new pot or thoroughly wash the original pot in a bleach solution and rinse it completely with water afterwards.
- Ensure the pot has very good drainage.
- Fill the pot with fresh cactus soil, or similarly good draining succulent soil. A mixture of compost, sand and perlite can be used.
- Water the soil by placing the pot in a basin or sink with a few inches of water. Leave it there for 15 minutes.
- Remove the pot from the basin and allow it to drain off excess water for 10 minutes.
- Make a hole in the soil so your aloe vera plant will 2 – 3 inches deep when covered.
- Put some hormone/rooting powder at the bottom of the hole to help the plant form new roots (you can also dip the root area of the plant into the rooting powder and then into rooting gel before planting).
- Place the aloe vera in the hole and cover with soil.
- You can use a small stick to give the aloe vera support if you wish.
Once treated be sure to follow our aloe plant care guide to ensure you prevent future problems and have a healthy blooming aloe vera for decades to come.
How to correctly water aloe to avoid root rot
Check out our aloe watering guide for more detailed information.
Thanks for reading! I'm Michael — houseplant fanatic and your Pinterest plant guide.
Follow me on Pinterest for fresh updates 🌿


