How To Plant Amaryllis Bulbs The Right Way
So you’ve decided to grow amaryllis and take advantage of the beautiful yearly blooms. You’ve bought an amaryllis bulb, have your pot ready and made sure you’ve got the correct potting mix soil. Now all you have to do is plant it. But how do you go about doing that?
Table of Contents
- How to correctly plant amaryllis bulbs
- How amaryllis bulbs should be planted – A detailed guide
- Bulb preparation prior to planting is essential
- The correct size pot for amaryllis is important
- You must plant amaryllis in the right type of soil
- The orientation of the planted bulb is more important than most people think
- The correct depth to plant an amaryllis bulb
- How & when to fertilizing the planted amaryllis bulb
- Amaryllis is not a throw-away plant – you can & should replant it
- How to plant amaryllis bulbs after dormancy
- How amaryllis bulbs should be planted – A detailed guide
How to correctly plant amaryllis bulbs
In this article I will cover in detail everything you need to know to plant amaryllis. But for those of you in a real hurry I have condensed the information into a few sentences. It seems that amaryllis bulbs can be confusing for many new home gardeners. At first glance it can be difficult to know which end of the bulb should be planted downwards. So how do you plant an amaryllis bulb?
Amaryllis bulbs should be planted so the pointy end of the bulb is visible above the soil line. Plant with the round end in the soil with about 1/3 of the bulb above the soil. Use an appropriate potting mixture ensuring the pot is large enough for growth and to allow for compaction of soil around the bulb.
Always remember that when it comes to an amaryllis houseplant, its pot should have very good drainage.
Below I go into more detail about planting an amaryllis bulb so you know how to pot this succulent correctly. If you intend to plant your amaryllis outdoors follow the same guidelines for bulb depth and orientation but you may also want to read my guide for using amaryllis outside.
How amaryllis bulbs should be planted – A detailed guide
Below are the steps you should follow to ensure your amaryllis bulb is planted correctly and grows healthy and provides colorful, abundant blooms.
Bulb preparation prior to planting is essential
For a new amaryllis bulb it is a good idea to soak it in water for several hours prior to planting it.
Soaking the bulb in water will help to stimulate new growth and decrease the time it take for new foliage to appear. In essence, soaking the bulb in water quickly rehydrates the roots of the plant and greatly speeds up the initial growth stages of the amaryllis.
I usually add some of the same floral feed that I use for cut amaryllis vase flowers, to the water as this will further promote new growth.
I would allow the bulb to soak for about 2 hours but no longer than 3 hours, before planting.
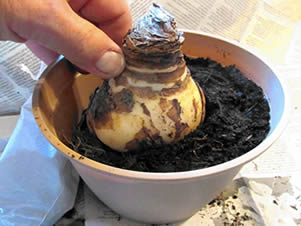
The correct size pot for amaryllis is important
The size of pot you need for an amaryllis bulb is also often a cause of concern for indoor gardeners knew to this succulent type.
A pot about 1 or 2 inches wider than the bulb and about 30cms in depth is ideal. Amaryllis grow best when the bulb is tightly compacted with soil. It is therefore necessary to choose a pot that is big enough to allow you to compact soil around the bulb but not so large that it dwarfs the bulb.
See the image below for the perfect size pot for an amaryllis bulb, in regards to a pot-to-bulb ratio.

You must plant amaryllis in the right type of soil
Many amaryllis owners who plant their succulents directly in the yard, in USDA climate zones 9 through 11, must make do with what they have. For indoor amaryllis growers we have no such restrictions and can choose a soil that will help create bountiful and colorful blooms. So what soil is best for amaryllis?
Amaryllis grows best in a nutrient rich soil. I find that a potting mix works exceptionally well for amaryllis. Though you can use a standard soil with a 10-10-10 ratio of NPK experience has shown me that potting mixtures are better.
Personally, I only grow indoor amaryllis in Miracle-Gro potting mix. I’m sure there are other great potting mixes out there which would be more than suitable for this type of succulent but I have had such great success with miracle-gro over the years that it remains my go-to choice to this day for amaryllis.
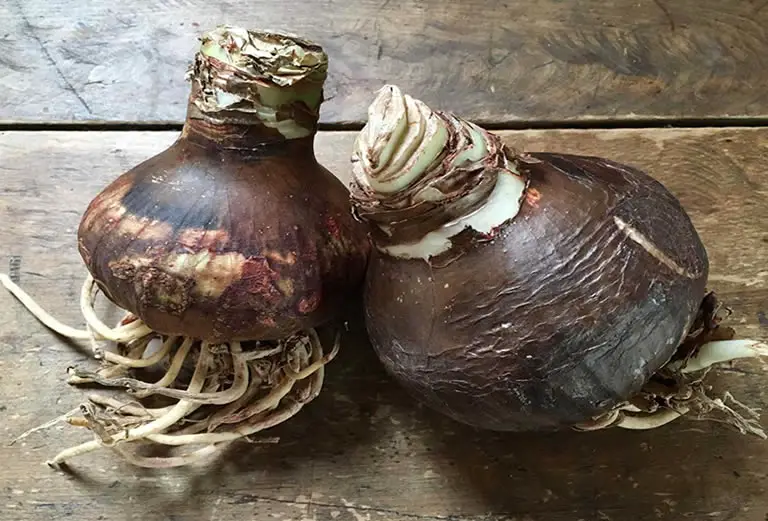
The orientation of the planted bulb is more important than most people think
The rounded end of an amaryllis bulb is the part of the bulb where the roots develop. This rounded end should be buried face down in the soil.
The opposite, pointed, end should sit several inches above the soil line.
You can see from the image further up this page how an amaryllis bulb should be potted. About 1/3 of the bulb remains above the soil.
What happens if you plant an amaryllis bulb upside down?
Some houseplant owners and gardeners will become concerned when they release that they have planted their bulbs upside down. How much of a problem is this with amaryllis?
If you plant an amaryllis bulb upside down the amaryllis will not grow as the roots will not be receiving any resources. When you discover that you have planted an amaryllis bulb upside down simply remove it from the soil and replant it with the pointy end above the soil.
Ideally you should always plant your bulbs pointy end up. But, having said that, it is rarely a major problem when you plant bulbs upside down because the bulbs will right themselves in the soil and reorient their new stems to point towards the surface. Obviously with an amaryllis bulb this is not possible because a large portion of the bulb remains above the soil.
If you have mistakenly planted an amaryllis bulb pointy end down then the roots that develop at the rounded end will be unable to gather water and nutrients from the soil and so the plant will not grow. To rectify this problem simply dig up the bulb and replant it the correct way with the pointy end above the soil and the rounded end below the soil.
Then, water the bulb and you are go to go.
The correct depth to plant an amaryllis bulb
Now that you know what size pot to use and which soil is best for amaryllis you will likely be wondering how deep you need to plant the bulb.
Two thirds of an amaryllis bulb should be buried in soil. As the top of an amaryllis bulb must remain above soil level you should fill about half the pot with soil before placing the bulb on top of it. Then compact more soil around the bulb ensuring the top 1/3 of the bulb remains above the soil.
Again, you can refer back to the image further up the page to see how the amaryllis bulb has been positioned in the soil so that 1/3 of it remains above soil level.
How & when to fertilizing the planted amaryllis bulb
When you plant an amaryllis bulb for the first time you not do need to fertilize it initially – at least if you have used the correct soil type. However, amaryllis are not just thirsty plants (see our amaryllis watering guide) they are also feeders.
I therefore recommend feeding amaryllis every 2 – 3 weeks during its growth stages paying particular attention to fertilization just before the stalks bloom. I will use a feed with either a 10-10-10 ratio of NPK (nitrogen, phosphorus, potassium), like these, or a good quality slow release succulent fertilizer for amaryllis.
Be careful not to go overboard with your fertilization routine as adding too much feed, or fertilizing too frequently, can lead to leaf burn. If you notice leaf burn before the plant blooms stop fertilizing your plant.
Amaryllis is not a throw-away plant – you can & should replant it
Many amaryllis owners dispose of the bulb when it loses all its foliage and the leaves drop off. This is a mistake. Amaryllis is a perennial that can live, and continue to bloom, for many decades. But should you leave amaryllis in its pot or should you replant it?
Amaryllis can, and should, be replanted after the bulb has come out of dormancy. After amaryllis blooming has finished the bulb will enter a 2 – 3 month dormant phase where it rests and gathers resources. When the bulb leaves dormancy and enters a new growth cycle it should be replanted in fresh soil and watered.
Replanting your amaryllis, (only after dormancy), will stimulate new growth and produce healthy, vibrant and colorful blooms. Do not replant an amaryllis bulb directly after blooming has finished. This will prevent the bulb from resting and will stimulate new growth. This in turn will lead to an overworked bulb and sickly plant.
How to plant amaryllis bulbs after dormancy
After amaryllis blooms the bulb should be allowed to go dormant and should not be replanted. Only after dormancy ends should the bulb be replanted. This will be between 2 – 3 months after blooming has finished.
It is important you do not replant your amaryllis bulb immediately after blooming has finished as doing so will almost certainly stimulate new growth. The bulb should be allowed to rest for several months before replanting.
You can either leave the bulb in its pot where it has been sitting (amaryllis do not require darkness to go dormant) or you can remove the bulb from the pot and store it in a cool, dimly lit place sitting on top kitchen towels or newspaper. The ideal temperature for a dormant amaryllis bulb will fall between 55° – 59°F .
Although it is possible to get amaryllis to rebloom immediately after blooming has finished, I really don’t advise it. These beautiful succulent plants can live for many decades and will continue to bloom year-on-year if you give them the simple care they need. Forcing amaryllis to rebloom exhausts the bulb and eventually leads to a sickly plant with poor blooms or no blooms at all.
For more information on the care of an amaryllis bulb after the plant blooms and to learn how do you bring amaryllis out of dormancy read this article.
Thanks for reading! I'm Michael — houseplant fanatic and your Pinterest plant guide.
Follow me on Pinterest for fresh updates 🌿


