How To Grow African Violets Indoors & Outdoors
In this article I cover everything you need to know about growing African violet. I cover the steps needed to grow African violet indoors and in what areas it is possible to grow it outdoors. I outline how to grow this plant from seed, through division or from cuttings and the steps you need to take to ensure you cultivate a healthy plant with steady continual blooms.
Table of Contents
- How To Grow African Violets Indoors & Outdoors
- 3 Ways To Grow African Violets Indoors
- Growing African Violets Outside
- Final Words On Growing African Violets
How To Grow African Violets Indoors & Outdoors
African violets, scientific name Saintpaulia, grow in Tanzania, southeastern Kenya and the tropical parts of east Africa.
Contrary to popular belief African violets are not actually violets. They only get their name due to the resemblance they have to violets.
Another popular myth that is incorrect is that African violets are succulents. They are not.
These flowering perennials are long-living plants, surviving and even thriving for many many decades, and will usually flower continually throughout the year – thus making them a very popular houseplant.
African violets are very easy to grow and also easy to propagate. So let’s get into how to do that now.
3 Ways To Grow African Violets Indoors
Although there are certain areas where it is possible to cultivate African violets outdoors, for most US residents growing African violets outside is just not possible.
Although I will briefly cover how to grow African violets outside at the end of this article, it is because almost all the visitors to this website live in areas where the local climate and weather conditions prevent outdoor African violet growth that the bulk of the information below applies to growing African violets indoors only.
There are three ways to grow African violet:
- By buying a fully grown or young plant and repotting it in a more permanent container (most plants are sold in standard red-brown plastic nursery pots).
- Growing from seed.
- Propagating a new plant from a cutting.
I will cover the second two ways of growing African violets in this article.
If you buy a fully grown plant from a nursery or store then you simply need to know how to repot it. You can follow the advice for repotting african violets given in this article though you will want to be aware of the correct steps for caring for the plant once it’s repotted in its new home.
The best way to grow African violets indoors
So what is the very best way you can grow African violets?
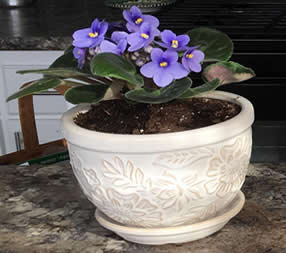
The best way to grow African violets is as a houseplant. By keeping African violets indoors you can ensure they have the correct correct temperature and lighting conditions year-round. As African violets are tropical plants that grow in warm misty mountainous regions they are not suitable for outdoor use in most US states and in many other countries.
African violets require a warm humid environment if they are to thrive and produce continual blooms.
Unlike many other houseplants that can grow in, and often thrive in, direct sunlight, African violets require indirect light to maintain healthy foliage and vibrant flowers. Direct light will burn African violet leaves which can cause a host of problems and a lack of blooms.
1. Growing African violets from seed
This method will show you how to grow African violet in pots from seed.
African violets are fairly easy to grow from seeds. Although many African violet plants are the result of propagation from cuttings or from dividing the plant, growing a new plant from seed is a very easy process.
You can use a pot but I prefer to sow seeds in a small cup
To grow African violets from seed I use either a small styrofoam or plastic cup for the initial growth stages. However, it is perfectly acceptable to plant the seeds directly into the pot the plant will stay in.
I use small cups simply so I can increase the volume of potential new growths and give myself a higher chance of cultivating plants – multiple small plastic cups are easier to store and tent than multiple larger containers or pots.
You can also source plastic cups cheap and thus try to grow many African violets at once.
Before you begin you must ensure you are using the correct soil. Standard potting mix, or succulent soil, are not the best growing mediums for african violets. These plants like a soil that is slightly acidic.
Although you can use peat moss at a pinch in the seeding process I suggest you use the correct soil mixture from the beginning as they will give your seeds the best chance of germination. I have an entire article on African violet soil the topic is of such importance.
Make sure the soil is slightly moist – but not wet. You can use a water mister to achieve this (I actually use a handheld water misting fan partly because I’m lazy and partly because it removes the chance of overwatering).
Mix the soil up with your fingers or a trowel to make sure the moisture penetrates all areas and isn’t just at the top layer.
Once you have patted the mixed-up soil down, not too tightly, it’s time to add the seeds.
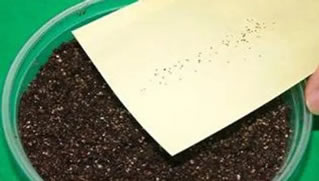
As best you can try to spread the seeds over the top of the soil evenly. This can be difficult with such small seeds. I find the easiest way to ensure you get an even spread is by placing the seeds on a piece of paper and gently shaking them over the soil from one side of the pot to the other.
Do not add any more soil to the pot after seeding it. African violet seeds are tiny and if you add soil on top of them you can bury them too deeply in the pot. As there are no natural predators in your home to eat the seeds they should germinate fine.
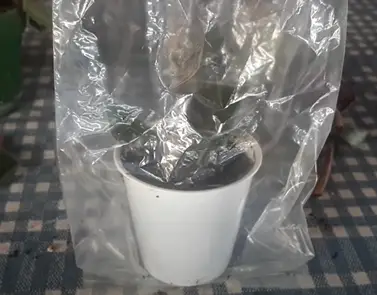
Lightly mist the soil again, making sure you do not soak it. Place a plastic grow bag or tent over the pot. Consider using a grow light to help with the germination and growth process.
Although not essential the use of grow lights will dramatically increase your success rate when growing african violets, with both seed germination and cutting propagation.
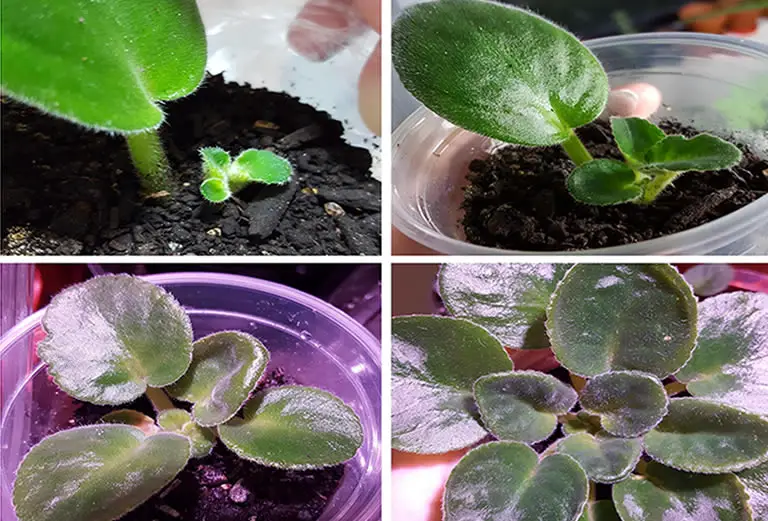
African violet seeds usually germinate pretty quickly and you can expect to see new shoots at anytime between 1 week to 9 weeks. And the new seedlings grow fairly fast after that.
Repot the seedlings at 1cm growth
You can repot your new African violet plant when its biggest leaf is about ½” (approx. 1 cm) in width. If you find that multiple seeds have germinated (lucky you) but they are too close together for healthy growth then you can separate the seedings when the biggest leaf is about ¼” (approx. 6 mm) in width.
This also helps to eliminate the chance of the roots of several new seedlings entangling.
Once repotted you can continue to use a plastic bag or tent to encourage fast growth or simply allow your African violets to continue growing naturally and unaided.
Do not water the plant again until the soil has visibly dried out.
Use a mister to dampen the soil when the African violet is still a seedling, being careful not to wet the new foliage growth. Using a mister will reduce the risk of overwatering your plant.
You can also add a little water to the bag so it sits at the sides of the pot. This will help maintain good humidity levels within the enclosed environment.
See our African violet watering guide for information on the water care of this plant.
2. Propagation – The 3 ways to propagate African violets from a parent plant
Using seeds is not the only way to grow a new African violet plant.
African violets are also easy to grow through propagation.
There are three main ways to propagate African violets.
The 3 ways to propagate African violets:
- Division at the crown.
- Division at the roots.
- Rooting leaf cuttings.
a) Division – using a newly formed crown as a new plant
Division, comes in two different forms, and they are both popular ways for propagating African violets, though they are somewhat advanced techniques and not really newbie-friendly.
The first way involves literally splitting the plant in two when a crown appears in the middle of the plant.
How to split the crown
By splitting the plant straight down the middle at the center of the crown you can create two plants where you previously only had one. Be aware though that this splitting can only be done when the plant develops a crown.
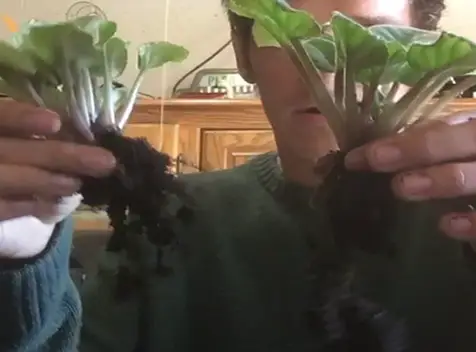
The second process of division is easier and involves separating the plant at the roots.
This can only be done when offsets appear to the side of the plant. By removing the entire plant from its pot and then gently splitting the roots to separate the offsets from the main plant you can create multiple new African violets.
This process can only be done when offsets are growing on the plant.
b) Potting cuttings – the most common propagation method
Propagating new plants from cuttings is the most common and popular way for growing new plants. It is also the easiest.
Although some plants can rarely, or never, be propagated from leaf cuttings an African violet is fairly easy to root from a simple leaf cutting and in most cases will produce a new plant.
But before I go into details about how to grow a new African violet plant through leaf propagation I want to highlight which one of the three propagation methods mentioned above is actually the best way to grow new African violets.
How to start an African violet from a leaf cutting
Propagating African violets from leaf cuttings is the most common way to grow a new plant.
Although this is the most popular method for starting an African violet, it is not the best method as far as success rates go.
It is the easiest though.
Your aim is to take a cutting from a healthy mature African violet plant and then treat the cutting so it produces roots and a new plant. I will now outline the exact steps you need to take to achieve this aim now.
How to root African violet cuttings
The method for propagating African violets from leaf cuttings is simple.
- First you should choose an African violet leaf that is full size. Any leaf that is between 8″ – 16″ wide will suffice.
- Carefully remove the leaf from the plant ensuring the stalk remains attached. Get as much of the stalk as possible.
- Use a small pot or styrofoam/plastic cup with small holes at the bottom for drainage.
- Fill the pot with African violet soil or another appropriate soil mixture made up of peat moss, vermiculite and perlite. The soil should be good draining and slightly acidic.
- Insert the leaf into the soil so that the base of the leaf blade lies just above the soil i.e. most of the stalk should be in the soil.
- I find that dipping the end of the stalk into some rooting powder and then into some rooting gel really helps increase my success rate.
- Mist the soil lightly so the soil is moist but not drenched.
- Place a plastic bag, or grow tent, over the pot.
- Place the plant in an area that gets good indirect sunlight. Do not place the pot in direct sunlight.
New cuttings should be taken February – April time and the soil temperature should be kept at about 65°F (which should be possible with a grow tent or plastic bag). If you can’t maintain that temperature naturally use a heat pad underneath the pot.
c) Water propagation – African violet cuttings root quickly in water
Although mature African violets should never be allowed to sit in water, and their soil should never be water-drenched, it is possible to root a leaf cutting in water.
How to root African violets in water
Below are the steps you need to follow to successfully root and propagate an African violet leaf in water:
- Prepare the container and water before taking a leaf cutting. African violet stems will harden and close over at the cut in about 15 – 20 minutes.
- Use a large wide-mouthed jar or container and fill it up with lukewarm water.
- Add a little floral feed, but only a little.
- Cover the jar with cling wrap (cling film in UK) and punch a small hole in the center just large enough to insert the cutting.
- Remove a leaf from the African violet plant making sure you get as much of the stem as possible.
- Insert the cutting into the water using the hole you created as the entry point.
- Place the jar somewhere that gets good indirect light. Do not put it in direct light but make sure there is at least 8 hours if indirect light each day. If you can give the cutting 12 hours of direct light that is even better (see our african violets light needs guide).
- Change the water once per week making sure you remember to use cling wrap on the top of the jar.
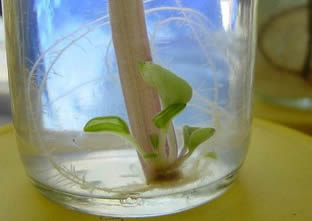
- Roots will form pretty quickly usually after about 1 – 2 weeks but you must wait until new plant growth appears before potting.
- After about 4 weeks there should be new plant growth visible near the base of the stem.
- Once the new growth (this is your new plant) is about ½” big you can pot the cutting.
If you are interested in trying this method then you will be pleased to know that I have a whole article on growing and propagating African violets in water which you can read here.
3. Growing African violets in self watering pots
With self-watering pots becoming very popular these days I often get asked if there are specific things you need to do to grow an African violet plant in one.
Self-watering pots are great for taking away the need to monitor your plant watering routine and they also help to maintain good humidity levels around most plants.
The only safe way to use a self watering pot while growing African violets
But, as African violets do not like to sit in water how should you use a self-watering pot with this specific plant?
Although you can use self-watering pots with African violets I advise against it. African violets are very water-sensitive and not all self-watering pots work the same way. It is best to water African violets by hand as this is the only way to water the plant correctly and avoid overwatering and root rot.
When African violets are overwatered they develop a very serious condition known as root rot. This is very difficult to treat and is serious enough to kill your plant.
Because African violets are so susceptible to overwatering and root rot, the soil will need to be checked routinely for indications of water soaking if you are growing your plant in a self-watering container. This completely defeats the purpose of having a self-watering pot in the first place as you will still need to check your plant regularly anyway just as you would if you were manually watering it.
With the potential for overwatering that comes with a self-watering pot (as far as African violets are concerned that is) and the need to check the plant routinely anyway it is just better to manually water your African violets as it will take very little additional effort and eliminate the chance of overwatering anyway.
Growing African Violets Outside
Can you propagate and grow African violets outside in your garden?
African violets can not be grown outside in most areas of the US. They are tropical plants that grow naturally in misty mountainous regions in countries like Tanzania and Kenya. So your yard is unlikely to have adequate conditions or be similar to their natural habitat. African violets are best grown indoors where you can regulate the environmental conditions around the plant.
Even if you successfully grow African violets outdoors in the more tropical US climate zones, the plant will never reach is full potential and may never bloom. These plants are not adapted to US outdoor life. Best keep your African violets indoors where you can continue to enjoy them for decades.
Where you can grow African violets outdoors
Ok so you live in a warm part of the US and are determined to try your hand at outdoor African violet cultivation. How can you do it?
If you live in certain areas of the US, such as Hawaii for example, you will be able to grow African violets outside. However, there are a few caveats. And, if you live in a USDA climate zone that is not tropical then don’t even attempt to cultivate African violets outdoors.
For more tropical US climate zones you can grow and keep African violets outdoors but it is unlikely you will get a healthy plant if you put them directly into your garden soil.
African violets need a specific type of soil to thrive and the soil in your yard just won’t do. So although you can grow and propagate African violets outdoors in some US states you will need to pot the plant ensuring it has the correct soil. You will also need to take steps to ensure the humidity levels are right for the plant and also ensure it doesn’t get rained on too much.
If you want to know more about the ideal humidity levels for African violets you can read our African violet humidity guide.
Another problem with growing African violets outdoors is direct sunlight.
African violets react badly to direct sunlight and need indirect light to bloom. If left outside in the direct sun they develop a host of problems. See our African violet leaves guide for more information on this topic.
Final Words On Growing African Violets
Hopefully I have covered all the essentials and you have all the information you need to get started growing African violets.
Below I briefly touch on two subjects related to growing African violets based on the two most common questions I get asked:
- How long doe sit take to grow African violets?
- Which method is the best for growing African violets.
Let me answer those questions now.
How long it takes to grow African violets from leaf cuttings
So how long will you have to wait for a new plant to grow from a leaf cutting?
When propagating a potted African violet leaf you should see new growth spout from the soil in 4 to 5 weeks. You will likely see new growth sooner when propagating African violets in water only because new growth in potted plants must first breakthrough the soil before being visible.
It can take as long as 12 months before the plant is mature enough to bloom.
When new growth appears you can remove tents from the plant and allow it to grow naturally. When it has grown to a large enough size (see previous sections) then you can pot it in its permanent container.
Expect the plant to take about 1 year before it starts to bloom. After this it should bloom continually or for at least 10 months of the year.
My opinion on which one is the best way to grow African violets
So we see that there are various ways to propagate a new African violet plant. But with 3 different ways to propagate African violets, which one will give you the best chance for success?
The best way to propagate African violets is by dividing the plant at the roots. When offsets appear an African violet plant can be divided into two or more separate plants at the roots. The next best way is to split an African violet in two when it has a crown. Leaf propagation is also a good way to propagate a new African violet. Although you may have less success with this method it is the easiest to do.
Dividing an African violet plant for propagation is such a huge topic, and requires such detailed instructions, that I will not cover it in this article. However, I do have an article dedicated to this very subject.
In that article I walk you through the process of dividing an African violet at the crown, where you essentially split the plant in two, and also the much easier method of division that involves dividing the plant at the roots once it grows offsets. You can access that information in the article that I linked to above.
However, although it is not the best method, by far the most common form of African violet propagation is through leaf cuttings.
So, I will outline the process for this type of propagation now and give you some key insights into how you can increase your chance of success using this method.
A quick overview of the best way to grow African violets:
- Plant African violets in a 4″ – 5″ pot. Plastic, ceramic or stone will do but I personally prefer terracotta.
- Avoid a self-watering pot for the reason I give below.
- Make sure you use the correct soil. It should be a potting mix that is slightly acidic and contains vermiculite and perlite or similar for good drainage.
- Give the plant only indirect sunlight.
- Only water an African violet when the soil dries out.
- Only use a dedicated African violet fertilizer or one that contains nutrients and humic and fulvic acids to ensure you get the correct pH value in the soil.
- Maintain good humidity levels directly around the plant.
- Repot the plant at least once per year. I repot in Spring, for various reasons, but you can repot at any time.
- Keep the plant indoors ensuring it sits somewhere that gets enough indirect light to promote a healthy, continual bloom.
Follow the above advice and you will have a healthy, continually-blooming African violet plant for many, many years.
Thanks for reading! I'm Michael — houseplant fanatic and your Pinterest plant guide.
Follow me on Pinterest for fresh updates 🌿


