8 Easy Ways To Propagate A ZZ Plant
There are 8 different ways to propagate a ZZ plant. I have listed each of the propagation methods below with instructions in a few quick bullet points for easy reference. However, I recommend you read the more in-depth instructions included in each subsection so you give yourself the best chance of propagation success.
Table of Contents
- Unlock the Secrets of ZZ Plant Propagation: A Comprehensive Guide
- 1. Propagating ZZ Plants From Leaf Cuttings
- 2. Rhizome Division: A Seamless Guide to Propagating ZZ Plants
- 3. Tuber Division: Propagating ZZ Plants with Ease
- 4. Root Ball Division: A Comprehensive Guide to ZZ Plant Propagation
- 5. Leaflet Cuttings: Unlocking ZZ Plant Propagation Potential
- 6. Water Propagation: A Refreshing Approach to ZZ Plant Expansion
- 7. Soil Propagation: Grounded Growth for ZZ Plants
- 8. Leaf-Bud Cuttings: Nurturing New Growth in ZZ Plants
Unlock the Secrets of ZZ Plant Propagation: A Comprehensive Guide
Many houseplant owners already know that ZZ plants are very easy to care for due to their resilience. But, you may not be aware of just how easy it is to propagate these succulents.
Discover the art of propagating ZZ plants and expand your indoor green haven effortlessly with our comprehensive guide above.
Whether you prefer the simplicity of leaf cuttings, the resilience of rhizome division, the charm of tuber division, or the visual appeal of water propagation, we’ve got you covered.
Begin with a healthy ZZ plant and choose your preferred method – be it leaflet cuttings for a hands-on approach, water propagation for a visually engaging process, or soil propagation for a grounded growth experience.
Dive into the step-by-step instructions, from selecting the right materials to caring for your new ZZ plant offspring.
Explore the unique techniques of rhizome and tuber division, unraveling the mysteries of ZZ plant propagation in an easy-to-follow format.
From leaf-bud cuttings to root ball division, each method comes with its own set of tips and considerations.
Embrace the joy of nurturing new ZZ plants, and watch your indoor oasis flourish with vitality. Happy propagating!
List of 8 Ways to Propagate a ZZ Plant
Below are the 8 ways you can use to propagate ZZ plants.
Some of the propagation methods will yield more success than others.
Likewise, some of the methods produce roots faster than others.
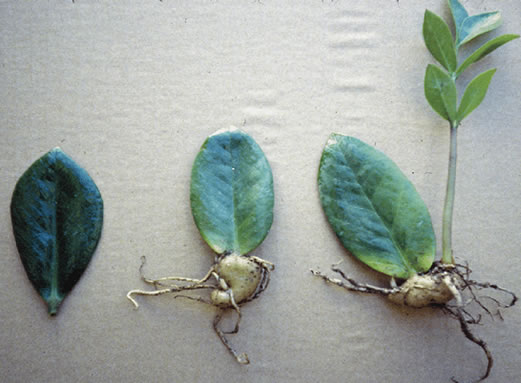
1. Leaf Cuttings
-
- Select a healthy ZZ plant leaf.
- Cut the leaf into sections, making sure each section has a portion of the rhizome (underground stem).
- Allow the cuttings to air dry for a day or two.
- Plant the cuttings in a well-draining soil mix.
2. Rhizome Division
-
- Carefully remove the ZZ plant from its pot.
- Identify sections of the rhizome with healthy stems and roots.
- Gently separate these sections from the main plant.
- Replant the divided rhizomes in new containers.
3. Tuber Division
-
- Similar to rhizome division but involves separating tuberous roots.
- Divide the tuber into sections, ensuring each section has both roots and stems.
- Plant the tuber divisions in new pots with suitable soil.
4. Root Ball Division
-
- Divide the root ball into sections, making sure each section has a portion of the root system.
- Replant the divided sections in separate containers.
- Ensure each new plant has both roots and stems for optimal growth.
5. Leaflet Cuttings
-
- Cut healthy leaflets from the parent plant, ensuring each cutting has a stem attached.
- Allow the cuttings to air dry briefly.
- Plant the cuttings in a soil mix and water sparingly until new growth appears.
6. Water Propagation
-
- Place leaf cuttings or sections of the rhizome in water.
- Change the water regularly to prevent stagnation.
- Once roots have developed, transfer the cuttings to soil.
7. Soil Propagation
-
- Plant leaf cuttings or rhizome sections directly into a well-draining soil mix.
- Maintain proper moisture levels to encourage root development.
8. Leaf-Bud Cuttings
-
- Cut a healthy ZZ plant leaf with a portion of the rhizome attached.
- Focus on sections with visible leaf buds.
- Plant the cuttings in soil, ensuring the leaf buds are slightly below the surface.
Remember to follow proper care instructions for the newly propagated ZZ plants, providing the right conditions for root development and overall growth.
Below I cover the above propagation methods in more detail.
1. Propagating ZZ Plants From Leaf Cuttings
Propagating a ZZ plant (Zamioculcas zamiifolia) from leaf cuttings is a rewarding and relatively straightforward process that allows you to expand your indoor greenery effortlessly.
This method is particularly popular due to its simplicity and the high success rate associated with ZZ plants.
Here’s a detailed step-by-step guide to propagating ZZ plants from leaf cuttings:
Materials Needed
- Healthy ZZ Plant: Ensure your parent ZZ plant is healthy and free from diseases. Healthy leaves will contribute to successful propagation.
- Clean, Sharp Scissors or Pruners: Use sterilized cutting tools to prevent the introduction of pathogens to the plant.
- Potting Mix: Prepare a well-draining potting mix. A mixture of perlite, peat moss, and coarse sand works well for ZZ plant propagation.
- Small Pots or Containers: Choose small pots or containers with drainage holes to plant your leaf cuttings.
- Rooting Hormone (Optional): While ZZ plants can often root successfully without hormone treatment, using a rooting hormone can expedite the process.
Step 1: Selecting and Cutting the Leaf
- Choose a Healthy Leaf: Select a mature, healthy ZZ plant leaf for propagation. Look for a leaf with vibrant green color and no signs of diseases or pests.
- Cut the Leaf: Using clean, sharp scissors or pruners, cut the selected leaf close to the base, ensuring you have a clean, straight cut. The cutting should be around 4 to 6 inches in length.
Step 2: Preparing the Leaf Cutting
- Leaflet Segments: Carefully separate the leaf into individual leaflet segments. Each segment should ideally have a stem attached.
- Allowing for Drying: Lay the leaflet segments in a dry, shaded area for a day or two. Allowing the cut ends to air dry helps prevent potential rotting.
Step 3: Planting the Leaf Cuttings
- Potting Mix: Fill small pots or containers with the prepared potting mix. Ensure the mix is well-draining.
- Planting Depth: Plant the leaflet segments about an inch deep in the potting mix. Ensure the cut end is below the surface.
- Spacing: Plant multiple leaflet segments in the same pot, ensuring they are spaced apart to allow room for growth.
Step 4: Watering and Humidity
- Watering: Water the newly planted leaf cuttings sparingly. Overwatering can lead to rot, so it’s crucial to maintain moderate moisture levels.
- Covering with Plastic: If you desire higher humidity levels, you can cover the pots with clear plastic or place them in a plastic bag to create a mini greenhouse effect. This can expedite root development.
Step 5: Care and Monitoring
- Indirect Light: Place the pots in an area with indirect light. ZZ plants prefer bright, indirect light but can tolerate lower light conditions.
- Patience is Key: Be patient as the ZZ plant leaf cuttings develop roots. It may take a few weeks to a couple of months for significant root growth to occur.
- Transplanting: Once the new plants have well-established roots and are showing signs of new growth, you can transplant them into larger containers or their permanent homes.
Tips and Considerations
- Temperature: Maintain a warm environment for the leaf cuttings, as ZZ plants prefer temperatures between 65°F to 75°F (18°C to 24°C).
- Rooting Hormone (Optional): If you choose to use a rooting hormone, follow the product instructions carefully. Dip the cut end of the leaflet segment into the rooting hormone before planting.
- Avoid Direct Sunlight: Protect the leaf cuttings from direct sunlight during the initial stages of propagation to prevent stress.
- Regular Monitoring: Keep a close eye on the moisture levels in the potting mix and adjust watering accordingly. Too much water can lead to root rot.
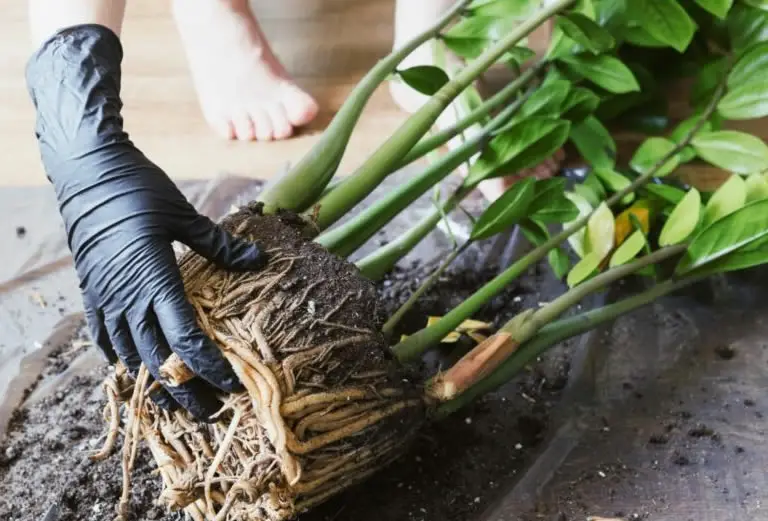
2. Rhizome Division: A Seamless Guide to Propagating ZZ Plants
Embark on a journey into the heart of ZZ plant propagation as we delve into the artistry of Rhizome Division.
This method, akin to orchestrating a botanical symphony, allows you to seamlessly multiply your ZZ plant collection.
From selecting a robust ZZ plant specimen to the gentle separation of rhizomes, our guide provides a melodic blend of precision and care.
Materials Needed
- Healthy ZZ Plant: Ensure your parent ZZ plant is healthy and free from diseases.
- Clean, Sharp Scissors or Pruners: Use sterilized cutting tools to prevent the introduction of pathogens to the plant.
- Potting Mix: Prepare a well-draining mix using perlite, peat moss, and coarse sand.
- Small Pots or Containers: Choose containers with drainage holes for optimal root health.
Step 1: Selecting and Preparing the ZZ Plant
- Healthy Specimen: Choose a mature ZZ plant that exhibits overall health.
- Remove from Pot: Gently remove the ZZ plant from its pot, being careful not to damage the roots.
- Identify Rhizome Sections: Identify sections of the rhizome that have healthy stems and roots.
Step 2: Dividing the Rhizome
- Gentle Separation: Gently separate the identified rhizome sections from the main plant.
- Trimming: Trim any damaged or unhealthy sections using clean cutting tools.
Step 3: Planting the Divided Rhizomes
- Potting Mix: Fill small pots with the prepared well-draining potting mix.
- Planting Depth: Plant the divided rhizomes in the pots, ensuring each section has both roots and stems.
- Watering: Water the newly planted rhizomes sparingly, avoiding overwatering.
Step 4: Care and Monitoring
- Indirect Light: Place the pots in an area with indirect light, protecting them from direct sunlight.
- Regular Monitoring: Monitor moisture levels, adjusting watering to prevent overwatering or drought.
- Transplanting: Once the new plants show signs of growth and have well-established roots, consider transplanting them into larger containers.
Tips and Considerations
- Warm Environment: Maintain a warm environment as ZZ plants thrive in temperatures between 65°F to 75°F (18°C to 24°C).
- Root Health: Protect the roots during division to ensure the health of the newly separated rhizome sections.
- Avoid Stress: Shield the plants from direct sunlight initially to prevent stress during the early stages of propagation.
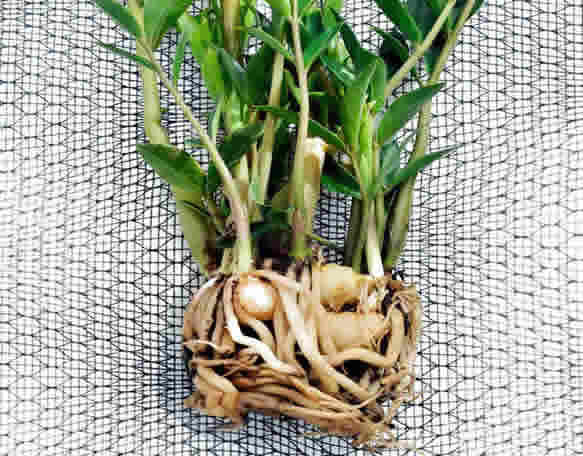
3. Tuber Division: Propagating ZZ Plants with Ease
ZZ plant propagation through Tuber Division is a method that unveils the harmonious process of multiplying your indoor green ensemble.
Propagating Zamioculcas zamiifolia through tuber division is a precise and effective approach, akin to orchestrating a verdant masterpiece.

This method’s popularity is rooted in its simplicity and the assurance of cultivating new ZZ plants from healthy tuberous roots.
Materials Needed
- Healthy ZZ Plant: Ensure your parent ZZ plant is vibrant and free from diseases.
- Clean, Sharp Scissors or Pruners: Use sterilized cutting tools to prevent the introduction of pathogens.
- Potting Mix: Create a well-draining mix using perlite, peat moss, and coarse sand.
- Small Pots or Containers: Opt for containers with drainage holes to promote root health.
Step 1: Selecting and Preparing the ZZ Plant
- Healthy Tuberous Roots: Choose a mature ZZ plant with healthy tuberous roots.
- Gentle Removal: Gently remove the ZZ plant from its pot, taking care not to damage the roots.
- Identifying Tuberous Sections: Identify sections of the tuberous roots that have both stems and healthy roots.
Step 2: Dividing the Tuber
- Careful Separation: Carefully separate sections of the tuberous roots, ensuring each section has stems and roots.
- Trimming: Trim any damaged or unhealthy sections using clean cutting tools.
Step 3: Planting the Divided Tubers
- Potting Mix: Fill small pots with the prepared well-draining potting mix.
- Planting Depth: Plant the divided tubers in the pots, ensuring each section has a balance of stems and roots.
- Watering: Water the newly planted tubers sparingly, avoiding overwatering.
Step 4: Care and Monitoring
- Indirect Light: Place the pots in an area with indirect light, protecting them from direct sunlight.
- Regular Monitoring: Monitor moisture levels, adjusting watering to prevent overwatering or drought.
- Transplanting: Once the new plants show signs of growth and have well-established roots, consider transplanting them into larger containers.
Tips and Considerations
- Warm Environment: Maintain a warm environment as ZZ plants thrive in temperatures between 65°F to 75°F (18°C to 24°C).
- Root Health: Protect the roots during division to ensure the health of the newly separated tuberous sections.
- Avoid Stress: Shield the plants from direct sunlight initially to prevent stress during the early stages of propagation.
4. Root Ball Division: A Comprehensive Guide to ZZ Plant Propagation
Now let’s look at ZZ plant propagation mastery via Tuber Division; a method for multiplying your botanical treasures.
This approach, heralded for its simplicity and effectiveness, offers a seamless path to expanding your ZZ plant collection.
Much like a horticultural alchemist, you can harness the power of healthy tuberous roots to cultivate thriving ZZ plants.
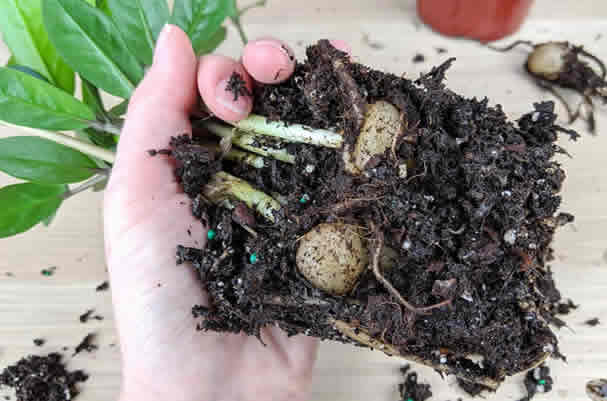
This section unveils the art and science of Tuber Division, a captivating process that allows you to witness the green magic unfold in your indoor haven.
Materials Needed
- Healthy ZZ Plant: Begin with a robust and disease-free ZZ plant.
- Clean, Sharp Scissors or Pruners: Ensure your cutting tools are clean and sharp for precise division.
- Potting Mix: Create a well-draining mix using a combination of perlite, peat moss, and coarse sand.
- Small Pots or Containers: Opt for containers with drainage holes to promote healthy root growth.
Step 1: Selecting and Preparing the ZZ Plant
- Healthy Root System: Choose a ZZ plant with a well-established and healthy root system.
- Gentle Removal: Carefully remove the ZZ plant from its pot, ensuring minimal disturbance to the roots.
- Inspecting the Root Ball: Examine the root ball, identifying sections with both healthy stems and roots.
Step 2: Dividing the Root Ball
- Gentle Separation: Gently separate sections of the root ball, keeping stems and roots intact.
- Trimming: Trim any damaged or unhealthy sections, using clean cutting tools.
Step 3: Planting the Divided Roots
- Potting Mix: Fill small pots with the prepared well-draining potting mix.
- Planting Depth: Plant the divided root sections in the pots, ensuring each section has a balance of stems and roots.
- Watering: Water the newly planted roots sparingly to avoid overwatering.
Step 4: Care and Monitoring
- Indirect Light: Place the pots in an area with indirect light, shielding them from direct sunlight.
- Regular Monitoring: Monitor moisture levels, adjusting watering to prevent overwatering or drought.
- Transplanting: Once the new plants show signs of growth and have well-established roots, consider transplanting them into larger containers.
Tips and Considerations
- Warm Environment: Maintain a warm environment as ZZ plants thrive in temperatures between 65°F to 75°F (18°C to 24°C).
- Root Health: Protect the roots during division to ensure the health of the newly separated root sections.
- Avoid Stress: Shield the plants from direct sunlight initially to prevent stress during the early stages of propagation.
5. Leaflet Cuttings: Unlocking ZZ Plant Propagation Potential
ZZ plant propagation through Leaflet Cuttings, a method that adds finesse to the art of expanding your indoor green haven.
Propagating Zamioculcas zamiifolia from leaflets is not only rewarding but also a straightforward process, elevating your plant parenting experience.
This method’s popularity stems from its simplicity and the high success rates associated with ZZ plants, making it an ideal choice for enthusiasts of all levels.
Materials Needed
- Healthy ZZ Plant: Begin with a robust and disease-free ZZ plant.
- Clean, Sharp Scissors or Pruners: Ensure your cutting tools are clean and sharp for precise cutting.
- Potting Mix: Prepare a well-draining mix using perlite, peat moss, and coarse sand.
- Small Pots or Containers: Choose containers with drainage holes to encourage healthy root development.
Step 1: Selecting and Preparing the ZZ Plant
- Vibrant Leaflets: Choose a mature ZZ plant with vibrant and healthy leaflets.
- Cutting Preparation: Using clean scissors or pruners, cut healthy leaflets from the ZZ plant. Ensure each cutting has a portion of the stem attached.
- Brief Air Drying: Allow the cut leaflets to air dry briefly for a day or two to promote callusing and reduce the risk of rot.
Step 2: Planting the Leaflet Cuttings
- Potting Mix: Fill small pots with the prepared well-draining potting mix.
- Planting Depth: Plant the leaflet cuttings in the pots, ensuring the cut end is slightly below the surface of the soil.
- Watering: Water the newly planted leaflet cuttings sparingly, avoiding overwatering.
Step 3: Care and Monitoring
- Indirect Light: Place the pots in an area with indirect light, shielding them from direct sunlight.
- Regular Monitoring: Monitor moisture levels in the potting mix, adjusting watering to prevent overwatering or drought.
- Transplanting: Once the new plants show signs of growth and have well-established roots, consider transplanting them into larger containers.
Tips and Considerations
- Warm Environment: Maintain a warm environment as ZZ plants thrive in temperatures between 65°F to 75°F (18°C to 24°C).
- Root Development: Promote root development by allowing the cuttings to establish themselves in the potting mix.
- Avoid Overwatering: Water sparingly to avoid overwatering, which can lead to root rot.
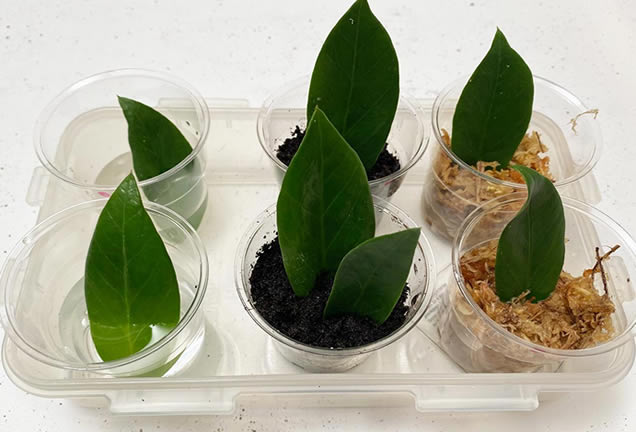
6. Water Propagation: A Refreshing Approach to ZZ Plant Expansion
ZZ plant propagation with Water Propagation is a captivating method that transforms your space into a lush haven.
Propagating Zamioculcas zamiifolia in water is a visually engaging and rewarding process, making it an ideal choice for plant enthusiasts seeking a dynamic approach to expanding their indoor greenery.
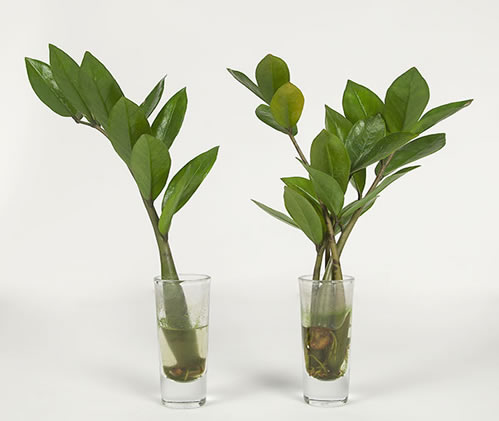
This method’s popularity is fueled by its simplicity and the enchanting spectacle of roots unfurling in water.
Materials Needed
- Healthy ZZ Plant: Start with a vibrant and disease-free ZZ plant.
- Clean, Sharp Scissors or Pruners: Ensure your cutting tools are clean and sharp for precise cutting.
- Clear Vessel: Choose a clear vessel to allow easy monitoring of root development.
- Water: Use clean, room temperature water for the propagation process.
Step 1: Selecting and Preparing the ZZ Plant
- Healthy Leaf Cuttings: Choose healthy ZZ plant leaf cuttings, ensuring each cutting has a portion of the stem.
- Cutting Preparation: Use clean scissors or pruners to cut the selected leaflet sections, and trim the stems to the desired length.
- Water Vessel: Place the leaf cuttings in a clear vessel, submerging the cut ends in water. Ensure that at least one node is submerged.
Step 2: Water Propagation Process
- Changing Water: Change the water regularly, at least once a week, to prevent stagnation and maintain a healthy environment for root development.
- Root Growth Monitoring: Observe the development of roots in the water. Roots typically appear in a few weeks.
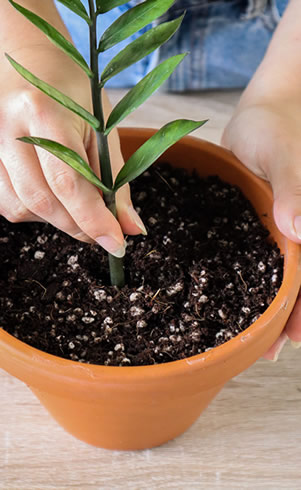
Step 3: Transition to Soil
- Root Development: Once roots are a few inches long, and there is a sufficient cluster, transfer the cuttings to soil for further growth.
- Potting Mix: Use a well-draining potting mix when transitioning the ZZ plant cuttings to soil.
- Planting Depth: Plant the rooted cuttings in soil, ensuring the roots are covered, and the plant is stable.
Step 4: Care and Monitoring
- Indirect Light: Place the newly potted ZZ plant cuttings in an area with indirect light.
- Gradual Acclimation: Gradually acclimate the plants to longer periods of direct light as they grow.
- Regular Watering: Water the newly potted ZZ plant cuttings regularly, allowing the soil to dry out slightly between waterings.
Tips and Considerations
- Node Placement: Submerge a node in water for optimal root development.
- Root Health: Ensure that the roots are healthy and well-developed before transitioning the ZZ plant cuttings to soil.
- Patience is Key: Be patient during the water propagation process, as it may take a few weeks for roots to develop.
7. Soil Propagation: Grounded Growth for ZZ Plants
ZZ plant propagation through Soil Propagation is a method that firmly roots your indoor oasis in lush greenery.
Propagating Zamioculcas zamiifolia in soil offers a reliable and straightforward approach, making it an ideal choice for cultivating a thriving ZZ plant family.
This method’s popularity stems from its simplicity and the assurance of healthy root development in a nourishing soil environment.
Materials Needed
- Healthy ZZ Plant: Begin with a robust, disease-free ZZ plant.
- Clean, Sharp Scissors or Pruners: Ensure your cutting tools are clean and sharp for precise cutting.
- Potting Mix: Prepare a well-draining potting mix using perlite, peat moss, and coarse sand.
- Small Pots or Containers: Choose containers with drainage holes for optimal root health.
Step 1: Selecting and Preparing the ZZ Plant
- Healthy Leaf Cuttings: Select healthy ZZ plant leaf cuttings with vibrant green color and no signs of diseases or pests.
- Cutting Preparation: Use clean scissors or pruners to cut the selected leaflets, ensuring each cutting has a portion of the stem.
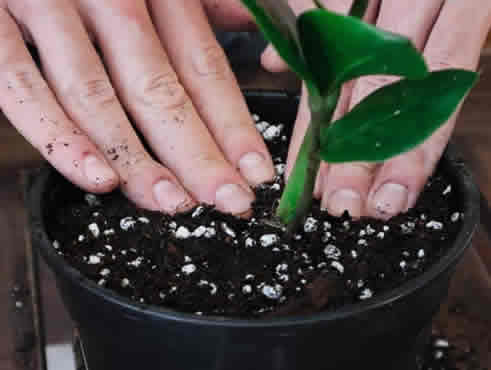
- Potting Mix: Fill small pots with the prepared well-draining potting mix.
Step 2: Planting the Leaf Cuttings
- Planting Depth: Plant the leaf cuttings in the pots, ensuring the cut end is slightly below the surface of the soil.
- Spacing: Plant multiple leaf cuttings in the same pot, ensuring they are spaced apart for optimal growth.
- Watering: Water the newly planted leaf cuttings sparingly, avoiding overwatering.
Step 3: Care and Monitoring
- Indirect Light: Place the pots in an area with indirect light, protecting them from direct sunlight.
- Regular Monitoring: Monitor moisture levels in the potting mix, adjusting watering to prevent overwatering or drought.
- Transplanting: Once the new plants show signs of growth and have well-established roots, consider transplanting them into larger containers.
Tips and Considerations
- Warm Environment: Maintain a warm environment as ZZ plants thrive in temperatures between 65°F to 75°F (18°C to 24°C).
- Root Development: Promote root development by allowing the leaf cuttings to establish themselves in the potting mix.
- Avoid Overwatering: Water sparingly to avoid overwatering, which can lead to root rot.
8. Leaf-Bud Cuttings: Nurturing New Growth in ZZ Plants
Embark on a journey of innovation with ZZ plant propagation through Leaf Bud Cuttings, a method that unveils the potential for dynamic growth and renewal in your indoor haven.
Propagating Zamioculcas zamiifolia through leaf bud cuttings is a nuanced yet rewarding process, infusing your space with the promise of fresh, vibrant growth.
This method’s popularity is driven by its ability to harness the essence of new beginnings and the robust potential encapsulated within leaf buds.
Materials Needed
- Healthy ZZ Plant: Begin with a robust ZZ plant that is free from diseases and pests.
- Clean, Sharp Scissors or Pruners: Ensure your cutting tools are clean and sharp for precise cutting.
- Potting Mix: Prepare a well-draining potting mix using a combination of perlite, peat moss, and coarse sand.
- Small Pots or Containers: Choose containers with drainage holes for optimal root health.
Step 1: Selecting and Preparing the ZZ Plant
- Healthy Leaf with Buds: Select a healthy ZZ plant leaf with visible leaf buds for propagation.
- Cutting Preparation: Use clean scissors or pruners to cut the selected leaf, ensuring it has a portion of the stem and visible leaf buds.
- Potting Mix: Fill small pots with the prepared well-draining potting mix.
Step 2: Planting the Leaf-Bud Cuttings
- Planting Depth: Plant the leaf-bud cuttings in the pots, ensuring the cut end is slightly below the surface of the soil.
- Spacing: Plant multiple leaf-bud cuttings in the same pot, ensuring they are spaced apart for optimal growth.
- Watering: Water the newly planted leaf-bud cuttings sparingly, avoiding overwatering.
Step 3: Care and Monitoring
- Indirect Light: Place the pots in an area with indirect light, protecting them from direct sunlight.
- Regular Monitoring: Monitor moisture levels in the potting mix, adjusting watering to prevent overwatering or drought.
- Transplanting: Once the new plants show signs of growth and have well-established roots, consider transplanting them into larger containers.
Tips and Considerations
- Warm Environment: Maintain a warm environment as ZZ plants thrive in temperatures between 65°F to 75°F (18°C to 24°C).
- Leaf Bud Placement: Ensure that the leaf buds are positioned slightly below the soil surface for optimal rooting.
- Root Development: Promote root development by allowing the leaf-bud cuttings to establish themselves in the potting mix.
Thanks for reading! I'm Michael — houseplant fanatic and your Pinterest plant guide.
Follow me on Pinterest for fresh updates 🌿


