How To Water Elephant Ears & Other Care Requirements
Elephant ears grow fairly easily outdoors in a large garden space but this plant can be cultivated just as easily in a large container kept indoors. As an outdoor plant and an indoor plant elephant ears are easy to look after.
Although I will cover the basic care needs of the elephant ears plant most people are most concerned about its watering needs, so I will address this first, With such big leaves, and with the plant originating in swamps, many people wonder how often they should be watering their plant and how much water they should give it.
Table of Contents
- How To Water Elephant Ears
- Elephant ears origins and basic care needs
- How often you should water elephant ears
- How much water elephant ears need. Moisture control.
- Other considerations for good elephant ear hydration and care
- How do you plant elephant ear bulbs?
- Caring for elephant ears in pots
- Caring for elephant ears outdoors – potted & yard plants
How To Water Elephant Ears
Elephant ears require regular watering especially throughout the growing season.
Both indoor and outdoor elephant ears require about 2 – 3 inches of water per week.
In the winter you can reduce this to about 1 inch of water to ensure you keep the soil moist.
Elephant ears origins and basic care needs
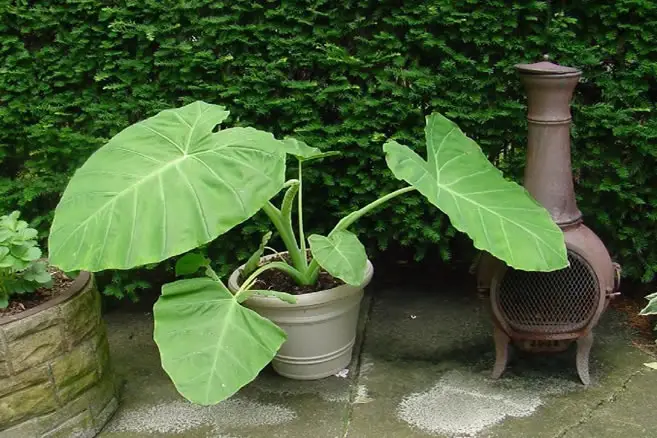
The elephant ear plant, also commonly referred to by its botanical name Colocasia, is a tropical plant that can be grown in pots indoors and outdoors and directly in the ground in gardens.
It can be cultivated from tubers (bulbs) or from rooted plants.
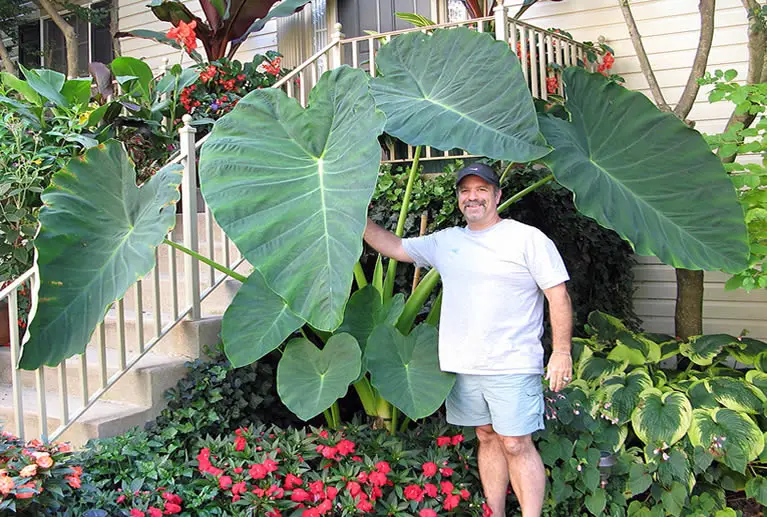
Elephant ears are best known for their very large heart-shaped leaves that resemble the ears of a large African elephant, hence the name.
The leaves of an elephant ear plant will usually grow to be about 1 foot tall and 6″ wide.
These large ear-like leaves hang from equally large stalks that can grow to up to 3 foot tall although some elephant ear plants will grow as tall as 5 foot.
Although the colors of an elephant ear plant’s foliage can vary from a dark purple/black color to a white/pink/green or a green/white color, the most common varieties found in gardens and home pots across the country will be a rich green.

Let’s take a look at some of the basic care needs of this unique plant starting with the most important aspect of elephant ears care – watering
How often you should water elephant ears
The elephant ear plant is naturally a swamp plant so it loves water. In swamp areas it will grow a resilient and strong root system even when fully submerged under water.
Being a water-based plant elephant ears are the perfect garden plant when planted close water features or ponds in the garden.
However, elephant ears are also very popular as an indoor plant especially in climate zones where they are not normally suited.
Elephant ears require a good deal of water. This means you will need to keep an eye on the amount of rainwater your outdoor elephant ear plants are getting.
For indoor pots, the elephant ear plant’s love of water means you will need to keep an eye of soil moisture levels and water your plant more often than most of your other houseplants.
Elephant ears are high water plants meaning they require a lot of water.
Elephant ears are water-thirsty plants. Outdoor plants require at least 1 inch of rainwater per week while indoor plants will require at least 2 – 3 inches of water per week.
Elephant ears require more water during the growing season so they can develop high stalks and large leaves.
The more water you give to the plant, without saturating it, the bigger it will grow. This means a daily watering routine is best.
Indoor elephant ear plants must be watered once daily during the warm summer months as they will drink a lot of water during that period.
The soil should be kept moist and not allowed to dry out.
The key to ensuring your elephant ears are getting enough water is to keep the soil moist without saturating it.
Although elephant ears are thirsty plants, just like any other plant you can give it too much water.
Over-watering your elephant ears may be much harder to do than it is with other plants, like perennials for example, it can still be done.
And all the same problems that come with over-watering any other plant will be applicable to your elephant ears.
So how do you know if you are over-watering your elephant ears?
You will know that you are over-watering your elephant ears if the leaves start to weep and you see water dripping from the tip of the leaves.
If you see signs that you have been over-watering your plant allow the plant to go one day without watering it. Then reduce the amount of water you give it rather than reducing the frequency of your watering i.e. still water the plant every day but give it much less water.
Remember, you want the soil to be moist but not saturated.
How much water elephant ears need. Moisture control.
Soil moisture is important for elephant ears. As a heavily water-dependent plant, dry soil is not good for elephant ears.
Too little water will lead to elephant ears with stunted growth and poor foliage or may even cause the death of the plant.
Always ensure the soil around your plant is kept moist.
There is no need to saturate the soil but it should be moist enough that if you place your fingers gently on top of the soil some of it will stick to your fingers.
Using mulch to maintain good soil moisture
Mulch is a great way of retaining water in the soil, especially when it comes to outdoor plants that are susceptible to water loss from evaporation via direct sunlight or high dry heat in the summer months.
Likewise, mulch can also protect against water loss from evaporation from high temperatures and dry air in the home, when home heating is engaged during the colder months.
What is the best mulch for elephant ears?
The best mulch for elephant ears is shredded wood. Shredded hardwood, pinestraw or similar mulch, works well.
Wood based mulch will keep the soil moist in the summer and protect the elephant ears tubers during the winter.
Although you can use any type of mulch on elephant ears I find that wood-based mulch works the best.
Heavy wood chip or shredded mulch, of say 3 inches, can really help to protect your elephant ears tuber during very cold winter months if you leave them in the ground or in an outdoor pot.
However, leaving this amount of mulch on your plant can also cause problems as the winter passes.
Leaving a large amount of mulch on your plant as winter passes into early spring can lead to plant disease and it can act as the perfect environment for many plant pests.
So don’t leave it on after winter.
If you do need to apply heavy mulch to your plant during the winter months, in order to protect the tuber, be sure to remove a large amount of it, or all of it, come spring.
If you don’t it will inhibit the growth of new seedlings.
Many gardeners will simply remove the tuber and keep it in a dry environment with a moderate temperature over the winter months.
Obviously if you grow your elephant ears as a houseplant removing the tuber is not necessary.
A good quality wood chip mulch is perfect for both indoor and outdoor use as it is both cheap and mess-free making it easy to apply and easy to remove.
Other considerations for good elephant ear hydration and care
Keeping your elephant ears plant hydrated is very important.
As you have already learned, elephant ears require regular watering and moist soil if they are to grow tall with healthy with large leaves.
But, hydration doesn’t just come from a good watering routine. Hydration must also come from a controlled environment.
Let’s look at how to best keep your elephant ears plant well hydrated through proper care of its environment.
The importance of humidity
Humidity is important to elephant ears especially if you have an indoor plant.
Humidity represents the amount of water that is in the air. Being a tropical plant Colocasia requires a certain amount of humidity to thrive as this replicates its natural environment.
Keeping humidity high enough for your indoor elephant ears plant is as easy as placing the plant container on a large saucer filled with pebbles and water.
Alternatively you can use a mister to ensure humidity levels stay high around the plant by misting the foliage regularly.
Fertilization
Elephant ears are not just water-thirsty plants, they love to feed as well. Elephant ear plants, especially indoor plants, should be fertilized once per month.
No matter what you read, please do not use coffee grounds as a fertilizer for elephant ears.
Although coffee grounds do have some beneficial uses, such as adding nitrogen to the soil, they can cause much more harm than good.
I never use coffee grounds on any plant that I am responsible for. Likewise, I avoid using tea for all the same reasons.
By far the best type of fertilizer you can use for your Colocasia elephant ear plants is one with a 20-10-20 ratio, like this one from Amazon which has been formulated specifically for elephant ears or this one from Master Blend which would work well too.
These type of fertilizers ensure the soil has the correct amount of nitrogen while maintaining the ideal percentage of nutrients for the growth of a healthy plant.
Best USD zones for elephant ears
Elephant ears can be grown anywhere and with correct care they will be grow to be sturdy and hardy plants. However, they will thrive best, and naturally, in zones 8 – 11.
If you are unsure which zone you live in check out our article on climate zone gardening.
In the chillier northern areas an outdoor elephant ear plant should be treated as an annual.
This means you will need to dig up the tubers and store them somewhere dry that has a more moderate temperature.
How do you plant elephant ear bulbs?
Although there are several different plant species that qualify as elephant ear plants, the bulbs of all elephant ear plants are some of the most confusing when it comes time to plant them.
When it comes time to plant your specific elephant ear plant it can feel like a puzzle determining which end of the bulb is which, and thus difficult to know which way to plant it.

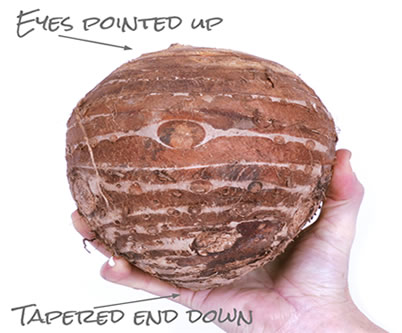
Above you can see an image of different types elephant ear bulbs and tubers.
If you are planting a tuber then the pointed end should go in head first and the flatter end should be facing the surface.
A typical elephant ear bulb, and most likely the one you will be planting, is round with no discernible points indicating which end is which.
Luckily though, in most cases the bulb will have a smooth side and a bumpy side – as you can clearly see in the featured image on this page.
It is from the smooth end of the elephant ear bulb that the plant stem sprouts and it is the bumpy end where most of the roots form.
So you should plant an elephant ear bulb smooth side up, bumpy side down. The depth of planting should be about 4 inches.
If planting in pots the ideal width of pot will differ between species.
How deep do you plant elephant ear bulbs?
Elephant ear plants are popular both as an outdoor garden plant, that is cultivated and grown directly in the yard, and also as an outdoor and indoor potted plant.
Elephant ear bulbs planted outdoors should be planted at least 2 – 4 feet apart.
Plant them about 4 inches deep i.e., the top of the bulb should be about 4 inches below the soil surface when covered.
Indoor potted elephant ear bulbs should be planted in containers made from non porous materials.
Glazed clay, ceramic and plastic work well as they help retain moisture in the soil better than the more common and more popular terracotta pots.
I personally try to avoid using plastic for plants that will stay in the pot long-term though.
Although I frequently use plastic pots for plant propagation I avoid using them as permanent containers because plastic, being a byproduct of oil, tends to break down over time and release harmful chemicals into the soil.
Width of pots should differ between elephant ear plant species.
For Colocasia varieties of elephant ears a container or pot that is at least 18 inches wide is recommended while for the much larger Alocasia varieties a 36 inches wide container is best.
By using a large pot or container you will allow the plant to grow to its full potential and also mitigate the need for repotting as the elephant ear plant continues to grow.
Another pro of using a large pot is water retention. Bigger pots will dry-out much more slowly than smaller ones and are thus protecting your water-thirsty elephant ear plant from drought.
When potting be sure to plant the elephant ear bulb about 4 inches below the soil surface in the same way you would plant it outdoors i.e. ensuring that at least 4 inches of soil lay above the top of the bulb.
The pot should have sufficient depth to encourage growth. Most pots at the width specifications given above will be sufficiently deep for an elephant ear plant to grow healthily but make sure any container you are using is at least 16 inches deep.
An elephant ear plant will grow in most nutrient-rich soils however adding a good potting compost, especially to indoor potted plants, will greatly help the soil retain its moisture.
A word about planting an elephant ears bulb upside down?
With no obvious way to tell which end of the bulb is which many newbie indoor and outdoor gardeners wonder which way you should plant an elephant ear bulb. It is also common to wonder if planting it upside down will result in growth problems.
So, what happens if you plant an elephant ear bulb upside down?
Planting an elephant ear bulb upside will not stop the plant from germinating. It will merely slow down the process of the stem breaking through the soil by a few days or weeks.
Although it is advisable to plant bulbs right-side up, planting them upside down or even sideways will not stop the plant from growing.
Although planting a bulb upside will not cause restriction of germination, sprouting or growth, it will slow down the process somewhat in the beginning.
Let’s look at what exactly happens to a bulb when it is planting upside down.
When you plant a bulb upside germination still happens.
When the bulb starts to sprout the stem will naturally orientate itself towards the sun.
However, in order to break through the soil surface the stem will have to navigate extra space as it initially sprouts downwards and must reorient itself towards the surface.
This slows down initial growth but once the shoot has broken the surface the plant will grow at a normal rate.
It is completely natural for a bulb to grow if it is planted upside down (or even sideways for the matter).
Why?
Because if planting a bulb upside down stopped plant growth then many plant species may well have died out long ago before mankind ever began plant cultivation.
In nature seeds and bulbs fall onto the ground in all different kinds of positions so it is necessary that they are able to germinate and sprout regardless of the position the bulb find itself in within the soil.
Once the bulb sprouts, the stem must be able to break through the soil surface in order for the plant to survive, and it therefore must be able to do this regardless of the position of the bulb is in, in the soil.
It is a inbuilt mechanism within all plants to seek out light and so, as a bulb sprouts and a stem begins to grow, it will naturally seek sunlight and thus orientate itself to the sun.
Obviously if the bulb is planted upside down the initial sprouting will occur in the wrong direction.
As the stem grows there is therefore additional space, filled with soil, that the stem must navigate before it can reorient itself upwards and eventually break through the soil surface.
Therefore, it can take a little longer, from a few days to a few weeks, for a bulb planted upside down to produce its first above ground stem.
Once the plant has started growing above ground its growth rate will be the same as it would be if the bulb had been planted right-side up as long, as you water and feed the plant correctly of course.
Caring for an elephant ear plant before, during and after bulb germination
Caring for an elephant ear plant is fairly easy.
Elephant ears require a lot of water so be sure that you understand how much you need to give your plant to maintain healthy growth and a healthy plant.
No matter what you read online, never feed your elephant ear plants coffee grounds or leftover liquid coffee, regardless of whether it is an indoor or outdoor plant.
The afore-linked article will you why.
I was once asked by an elephant ear plant owner if the yellowing on her plant had to do with the depth at which she planted the elephant ear bulb.
She was worried the bulb had not be given enough room to develop a healthy root system.
Although I don’t think this is a common concern for elephant ear plant owners I will quickly address it here just in case some of you are wondering if the depth will affect the health of the plant.
Leaf problems in elephant ear plants have nothing to do with the depth of the bulb though it may have something to do with the health of the soil.
You should read this article if you are having problems with the leaves on your elephant ear plant dying.
Having said that, if you see part of the bulb protruding from the soil surface then you should either cover it with additional soil. Alternatively, you can gently dig it up and bury it deeper in the existing soil to a depth of about 4 inches.
As I mentioned earlier, elephant ear plants require a lot of water but they are not just water-thirsty they tend to be big feeders as well.
So, it is fine to feed the plant an appropriate fertilizer once a month during growing season.
By far the best type of fertilizer for elephant ear plants is one with a 20-10-20 ratio that has been formulated specifically for elephant ears, like this one from Amazon or this one from Master Blend.
Caring for elephant ears in pots
Growing elephant ears from bulbs planted in pots is the easiest way to do it.
Indoor elephant ear plants should be watered on a very regular and consistent basis especially in winter when home have can dry the air.
Although you should never soak a potted elephant ear plant neither should you ever allow the soil to completely dry out.
Feed your indoor elephant ear plant once per month during growing season.
Caring for elephant ears outdoors – potted & yard plants
Elephant ear plants are much easier to grow and care for indoors but this does not mean that they are not a great outdoor plant.
Once an elephant ear plants have sprouted from their bulb, and shoots appear from the soil, these plants generally require very little attention.
However, as I already stated elephant ears are water-thirsty plants, so during dry spells you will want to water your outdoor plants regularly.
Although not absolutely necessary, you may also want to apply a slow-release fertilizer to the soil periodically.
In the winter months. If you live in the much colder Northern States, or Canada, don’t be tempted to leave the tuber in the ground or in an outdoor pot, even if you use mulch.
It is much too cold during your winters and the plant will likely not survive if left outdoors.
Stored tubers can be replanted in the spring and will produce healthy elephant ears if treated properly once planted.
Thanks for reading! I'm Michael — houseplant fanatic and your Pinterest plant guide.
Follow me on Pinterest for fresh updates 🌿


